Superblog
For example:
About
Name: Docs Description: Superblog is a blazing-fast and auto-SEO blogging platform. URL: https://superblog.ai/docs
Navigation Menu
- Home: https://superblog.ai
- Features: https://superblog.ai/features
- FAQ: https://superblog.ai/faq
- Pricing: https://superblog.ai/pricing
- Templates: https://superblog.ai/templates
- More: #
- Blog: https://superblog.ai/blog
- Case Studies: https://superblog.ai/blog/category/case-studies/
- Docs: https://superblog.ai/docs
- Community: https://write.superblog.ai/community
- Contact: https://superblog.ai/contact
- Try Superblog: https://superblog.ai
Blog Posts
Outrank
Author: Sai Krishna Author URL: https://superblog.ai/docs/author/sai-krishna Published: 2026-05-30 Category: Integrations Category URL: https://superblog.ai/docs/category/integrations Tags: outrank Tag URLs: outrank (https://superblog.ai/docs/tag/outrank) URL: https://superblog.ai/docs/outrank
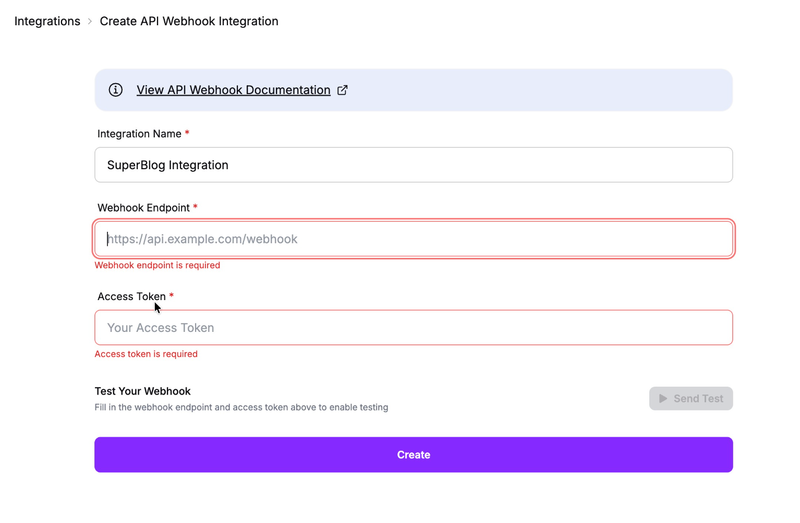
You can connect your superblog to Outrank with official integration support via Webhook Integration.
How to:
-
Visit "Integrations" page in your Outrank dashboard.
-
Go to "Create API Webhook Integration" section.
-
Enter the value ` https://write.superblog.ai/api/webhooks/outrank ` in the Webhook Endoint field.
-
Create an API Key as shown here. [View Dashboard > Data > API Keys]
-
Click the 'Create' button.
This blog is powered by Superblog. Visit https://superblog.ai to know more.
Keyboard Shortcuts
Author: Sai Krishna Author URL: https://superblog.ai/docs/author/sai-krishna Published: 2026-05-17 Category: Editor Category URL: https://superblog.ai/docs/category/editor URL: https://superblog.ai/docs/keyboard-shortcuts
You can see the keyboard shortcuts for the superblog editor below.
Text Formatting
Shortcut
Action
Cmd/Ctrl + B
Bold
Cmd/Ctrl + I
Italic
Cmd/Ctrl + U
Underline
Cmd/Ctrl + Shift + S
Strikethrough
Cmd/Ctrl + K
Insert/Edit link
Alt/Option + Shift + L
Align left
Alt/Option + Shift + C
Align center
Alt/Option + Shift + R
Align right
Cmd/Ctrl + Z
Undo
Cmd/Ctrl + Shift + Z
Redo
Markdown Formatting
The editor supports markdown shortcuts as you type:
Type this
To get
# Heading
Heading 2
## Heading
Heading 2
### Heading
Heading 3
**bold**
bold
*italic*
italic
~~strikethrough~~
Strikethrough
`code`
inline code
- item or * item
Bullet list
1. item
Numbered list
> quote
Blockquote
---
Horizontal divider
This blog is powered by Superblog. Visit https://superblog.ai to know more.
Why are my posts not indexed?
Author: Sai Krishna Author URL: https://superblog.ai/docs/author/sai-krishna Published: 2026-05-11 Category: FAQ Category URL: https://superblog.ai/docs/category/faq URL: https://superblog.ai/docs/why-are-my-posts-not-indexed
- Make sure your site's robots.txt contains your superblog's sitemap.xml.
For example:
yourwebsite.com is your main website.
yourwebsite.com/blog is your superblog.
yourwebsite.com/robots.txt should contain yourwebsite.com/blog/sitemap.xml.
if you blog.yourwebsite.com is your superblog, then
yourwebsite.com/robots.txt should contain blog.yourwebsite.com/sitemap.xml.
-
Make sure you added your website (including subdomains) to Google Search Console.
-
Sometimes Google decides not to index pages which have low quality content. Make sure your content is good quality.
This blog is powered by Superblog. Visit https://superblog.ai to know more.
Why is the performance score low in lighthouse audit?
Author: Sai Krishna Author URL: https://superblog.ai/docs/author/sai-krishna Published: 2026-04-14 Category: FAQ Category URL: https://superblog.ai/docs/category/faq URL: https://superblog.ai/docs/why-is-the-performance-score-low-in-lighthouse-audit
You should be auditing the post URL (yourwebsite.com/post-abc-123) and not the blog URL (yourwebsite.com/blog).
If you are getting low scores even after then this could be due to a number of reasons.
-
If you are using superblog on a subdirectory (yourwebsite.com/blog), the request to the page hits your server first and then it has to be rendered by your server. These steps could add potential delays and cause the problem.
-
You might have added custom js scripts to your superblog that are unoptimised.
-
You might have added custom widgets in your blog post that are causing delays.
-
Run the audit 3 times to avoid cache issues.
This blog is powered by Superblog. Visit https://superblog.ai to know more.
Internal Link Suggestions
Author: Sai Krishna Author URL: https://superblog.ai/docs/author/sai-krishna Published: 2026-03-17 Category: Editor Category URL: https://superblog.ai/docs/category/editor Meta Title: Internal link suggestions in the Superblog editor Meta Description: How to use internal link suggestions in the Superblog editor to add relevant internal links faster. URL: https://superblog.ai/docs/editor/internal-link-suggestions
Internal Link Suggestions
Post Editor > Internal Link Suggestions
Internal links help readers discover related content and help search engines understand the relationship between your posts.
Superblog includes an internal link suggestion tool directly inside the post editor so you can add relevant links without doing the manual hunting yourself.
What the feature does
The suggestion tool looks for related published posts and ranks them using signals such as:
- shared category
- shared tags
- title keyword overlap
It then suggests places in your current post where those links can be inserted.
How to use it
- Open a post in the editor.
- Find
Internal Link Suggestions. - Click
Get Suggestions. - Review the suggested target posts.
- Choose the suggested anchor text you want to link.
- Insert the link.
What you can do from the tool
For each suggested post, you can:
- preview the target title
- see why it was suggested
- copy the post URL
- open the post in a new tab
- insert the internal link directly into your current content
How anchor text works
The tool scans your current content and tries to find relevant text snippets that can be used as anchor text.
This helps you avoid generic anchors like click here and makes internal linking more natural.
It can also help replace an existing link if you want to update that anchor to point to a better destination.
Best practices
- Add tags and categories to posts so the suggestions are stronger.
- Use natural anchor text that matches the sentence.
- Link only when the destination genuinely helps the reader.
- Prefer links to strong, relevant posts instead of forcing links everywhere.
Why this matters
Good internal linking can help you:
- improve content discovery
- distribute attention across related articles
- reinforce topic clusters
- make long-term SEO maintenance easier
When suggestions may be weak
You may see few or no suggestions if:
- the post has little content yet
- the post has no tags or category
- your site has very few related published posts
- the current post does not contain useful anchor opportunities yet
If that happens, add more context to the article, assign tags, and try again.
A simple workflow
A practical workflow is:
- finish a rough draft
- add categories and tags
- run internal link suggestions
- insert the best links
- review the final reading flow before publishing
This keeps internal linking fast, intentional, and built into your editing process instead of becoming a manual SEO chore later.
This blog is powered by Superblog. Visit https://superblog.ai to know more.
AI Helper
Author: Sai Krishna Author URL: https://superblog.ai/docs/author/sai-krishna Published: 2026-03-17 Category: Dashboard Category URL: https://superblog.ai/docs/category/dashboard Meta Title: AI Helper in Superblog Meta Description: How to use AI Helper in Superblog to generate post outlines from a keyword or topic. URL: https://superblog.ai/docs/dashboard/ai-helper
AI Helper
View Dashboard > AI Helper
AI Helper helps you go from a keyword or topic to a structured draft direction faster.
Instead of starting from a blank page, you can generate a post outline and use it as the base for your article.
What AI Helper does
You enter a keyword or topic, and Superblog generates:
- a suggested post title
- a structured outline
- a draft direction you can review before writing
The generated output is designed to help you start faster, not replace your judgment.
How to use it
- Open
AI Helperfrom the dashboard. - Enter a keyword or topic.
- Click
Generate Post Outline. - Review the generated result.
Example topics:
best books for businesstechnical seo checklisthow to build a content calendar
What happens next
After generation, you can open the outline preview and use it as the basis for your actual post creation workflow.
Superblog also keeps a history of previous AI runs so you can come back and review earlier generated outlines.
Good ways to use AI Helper
AI Helper works best for:
- brainstorming article structure
- turning a broad topic into sections
- getting unstuck when you do not know how to frame a post
- quickly testing several angles for the same topic
Best practices
- Use specific topics instead of vague one-word prompts.
- Edit the outline so it matches your expertise and audience.
- Add examples, screenshots, opinions, and original insights before publishing.
- Treat the result as a starting point, not finished content.
Important note
AI Helper is a planning tool. You should still review everything for accuracy, tone, and originality before publishing.
The strongest workflow is:
- generate an outline
- write the post with your own expertise
- refine metadata and structure in the editor
- publish when the article is genuinely useful
Related workflow
Once your post exists, you can continue optimizing it inside the editor with features like advanced SEO controls, post translations, and internal link suggestions.
This blog is powered by Superblog. Visit https://superblog.ai to know more.
Is there a guest authors feature?
Author: Sai Krishna Author URL: https://superblog.ai/docs/author/sai-krishna Published: 2026-03-11 Category: FAQ Category URL: https://superblog.ai/docs/category/faq URL: https://superblog.ai/docs/is-there-a-guest-authors-feature
No.
Only team members can create posts. ADMIN/EDITOR can assign posts to existing team members. If any team member is removed, all those posts will be automatically assigned to the OWNER.
This blog is powered by Superblog. Visit https://superblog.ai to know more.
Widgets
Author: Sai Krishna Author URL: https://superblog.ai/docs/author/sai-krishna Published: 2025-12-31 Category: Editor Category URL: https://superblog.ai/docs/category/editor URL: https://superblog.ai/docs/editor/widgets
Widgets are powerful content blocks that help you create rich, engaging blog posts. Access them by typing / on a new line to open the widget menu, and start typing to find one to use.
You can see all the widgets available, how to use them, and actually see each of them embedded in the page.
Image
Add images to your posts from multiple sources - upload from your device, search Unsplash's library of free photos, or use images from your media library.
 Shot by the founder of Superblog
How to add an image :
-
Type
/imageand press Enter -
Or drag and drop an image directly into the editor
-
Or paste an image from your clipboard
Image sources :
-
Upload - Select images from your device (supports JPG, PNG, GIF, WebP)
-
Unsplash - Search millions of free, high-quality photos
-
My Media - Choose from images you've previously uploaded
Note:
-
Add alt text for accessibility and SEO (required)
-
Images are automatically optimized for web delivery
📸 Tip: Always add descriptive alt text to your images. It helps with SEO and makes your content accessible to readers using screen readers.
Image Gallery
Display multiple images in a beautiful, responsive layout. Perfect for showcasing a collection of photos, product images, or visual stories.


 Photo by Alex Talmon on Unsplash
Iceland is on the same planet as ours
How to create a gallery :
-
Type
/galleryand press Enter -
Select up to 9 images from Upload, Unsplash, or My Media
-
Images automatically arrange in an optimized layout
Gallery layout: The gallery uses an intelligent auto-layout that distributes images across rows based on their aspect ratios, similar to how photos appear in professional publications. Images are arranged to create a visually balanced composition.
Features :
-
Supports 2-9 images per gallery
-
Responsive design adapts to screen size
-
Click any image to view in lightbox
-
Navigate between images with arrow keys in lightbox
🖼️ Tip: For best results, use images with different aspect ratios to let the auto-layout handle the mosaic arrangement.
YouTube Video
Embed YouTube videos directly in your posts. Videos are embedded responsively and work on all devices.
How to embed a video :
-
Type
/youtubeand press Enter -
Paste the YouTube video URL
-
Choose your preferred size (small, medium, or large)
Supported URL formats :
-
https://www.youtube.com/watch?v=VIDEO_ID -
https://youtu.be/VIDEO_ID
Size options :
-
Small - Compact size for supplementary content
-
Medium - Balanced size for most use cases
-
Large - Full-width for featured videos
🎬 Tip: Videos are lazy-loaded for better page performance. They only load when readers scroll them into view.
Tweet / X Post
Embed tweets and X posts to add social proof, quotes, or conversations to your content.
How to embed a tweet :
-
Type
/tweetand press Enter -
Paste the tweet URL
Supported URL formats :
-
https://twitter.com/username/status/ID -
https://x.com/username/status/ID
The embedded tweet displays the author's profile picture, name, handle, tweet content, and engagement metrics just like it appears on X/Twitter.
Table
Create data tables with customizable rows and columns. Perfect for comparisons, pricing, schedules, or any structured data.
Example Column 1
Example Column 2
Example Column 3
Example Row 1
Example Row 1
Example Row 1
Example Row 2
Example Row 2
Example Row 2
Example Row 3
Example Row 3
Example Row 3
Example Row 4
Example Row 4
Example Row 4
How to create a table:
-
Type
/tableand press Enter -
Choose the number of rows and columns
-
Tables are created with a header row by default
Editing tables :
-
Click any cell to edit its content
-
Use Tab to move to the next cell
-
Use Shift+Tab to move to the previous cell
-
Right-click for options to add/remove rows and columns
Styling :
-
Header row is automatically styled
-
Tables are responsive and scroll horizontally on mobile
Code Block
Add syntax-highlighted code snippets to your posts. Supports 50+ programming languages with automatic syntax highlighting.
package main

import "fmt"

func main() {
    fmt.Println("Hello, World!")
}
How to add code:
-
Type
/codeand press Enter -
Select your programming language from the dropdown
-
Paste or type your code
Supported languages include: JavaScript, TypeScript, Python, Go, Rust, Java, C++, Ruby, PHP, SQL, HTML, CSS, Bash, JSON, YAML, Markdown, and many more.
Features :
-
Automatic syntax highlighting
-
Language label displayed in the corner
-
Preserves indentation and formatting
-
Copy button for readers (on the published site)
💡 Tip: Choose the correct language for accurate syntax highlighting. Use "Plain Text" if your language isn't listed.
Horizontal Rule
Insert a visual divider to separate sections of your content. Useful for breaking up long posts or indicating topic changes.
How to add a divider :
-
Type
/dividerand press Enter -
Or type
---on a new line and press Enter
The divider renders as a subtle line that adapts to your blog's theme.
CTA Button
Create eye-catching call-to-action buttons to drive reader engagement. Use them to link to products, sign-up pages, downloads, or any important destination.
Try superblog for free
How to create a button :
-
Type
/buttonand press Enter -
Enter the button text
-
Add the destination URL
-
Choose primary or secondary style
Button styles :
-
Primary - Bold, filled button for main actions
-
Secondary - Outlined button for secondary actions
Alignment options :
- Left, center, or right alignment
🎯 Tip: Use action-oriented text like "Get Started," "Download Now," or "Learn More" for better click-through rates.
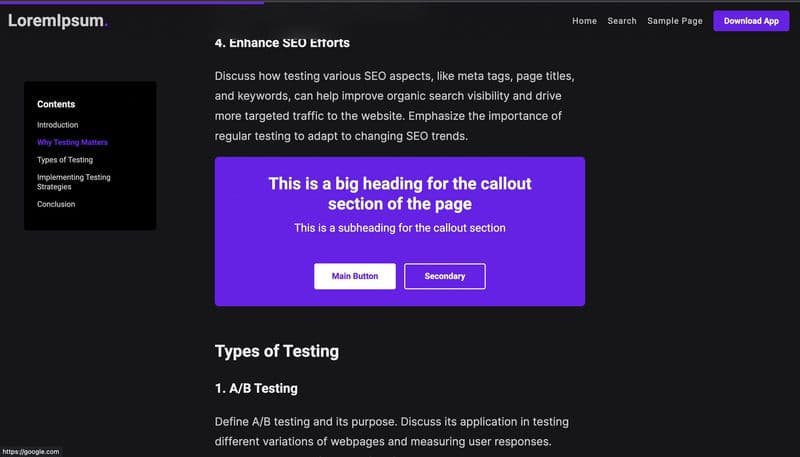
Callout
Create attention-grabbing callout sections with a heading, description, and call-to-action buttons. Perfect for newsletter sign-ups, special announcements, or promotional content.
This is a big heading for the callout section of the page
This is a subheading for the callout section
How to create a callout :
-
Type
/calloutand press Enter -
Add a heading and optional subheading
-
Add one or two CTA buttons
-
Choose your preferred style
Callout elements :
-
Heading - Main message (required)
-
Subheading - Supporting text (optional)
-
Primary Button - Main call-to-action
-
Secondary Button - Alternative action (optional)
Features :
-
Full-width design that stands out from regular content
-
Customizable button text and links
-
Responsive layout
Post Card
Link to other posts from your Superblog with a rich preview card. Great for cross-promoting related content and keeping readers engaged.

How to add a post card :
-
Type
/postand press Enter -
Search for a post by title
-
Click to insert the card
Card displays :
-
Post thumbnail image
-
Post title
-
Category (if assigned)
-
Excerpt preview
The card links directly to the post, making it easy for readers to discover more of your content.
📝 Note: Post cards show the content as it was when the card was created. If you update the linked post's title or excerpt, you'll need to re-insert the card to show the changes.
Embed from URL
Embed content from popular platforms using just a URL. The editor automatically detects the platform and creates the appropriate embed.
How to embed :
-
Type
/embedand press Enter -
Paste the URL from a supported platform
Platforms examples :
-
Audio: Spotify, SoundCloud, Apple Podcasts
-
Video: Vimeo, Loom, Wistia
-
Design: Figma, CodePen, CodeSandbox
-
Documents: Google Docs, Google Sheets, Google Slides
-
Other: Calendly, Typeform, Airtable, and more
Simply paste the share URL from any platform and the embed will be created automatically.
Custom HTML / Embed Code
Insert raw HTML, embed codes, or iframes for complete flexibility. Use this for third-party widgets, custom scripts, or any content not supported by other widgets.
Also, if you are not able to embed a particular URL then you can use this widget to embed it into your blog post by pasting the full embed code.
How to add custom HTML:
-
Type
/htmland press Enter -
Paste your HTML code or embed snippet
Common use cases :
-
Third-party newsletter signup forms
-
Custom widgets from other services
-
Iframe embeds
-
Custom JavaScript snippets
-
Analytics or tracking codes
Features :
-
Live preview in the editor
-
Supports any valid HTML
-
Scripts execute on the published page
⚠️ Caution: Only use HTML from trusted sources. Malicious code could affect your site's security and performance.
Markdown
Convert Markdown content to HTML and insert it into your post. Useful for importing content or for writers who prefer Markdown syntax.
How to use :
-
Type
/markdownand press Enter -
Paste or type your Markdown content
-
Click Insert to convert and add to your post
Supported Markdown features:
-
Headings (
# H1,## H2, etc.) -
Bold, italic, strikethrough
-
Links and images
-
Ordered and unordered lists
-
Blockquotes
-
Code blocks and inline code
-
Tables
The Markdown is converted to HTML and inserted as regular content that you can continue editing.
Help
Type /help in the editor to see all available widgets and shortcuts.
Read all the shortcuts here.
This blog is powered by Superblog. Visit https://superblog.ai to know more.
Intro
Author: Sai Krishna Author URL: https://superblog.ai/docs/author/sai-krishna Published: 2025-12-26 Category: Editor Category URL: https://superblog.ai/docs/category/editor URL: https://superblog.ai/docs/editor
We set out to build the world's best text editor to write blog posts. We lovingly call it Velocity Editor.
-
Select any text to see the formatting toolbar.
-
Type / for widgets. For example, /image will show the image widget.
-
And oh, markdown is supported. Type freely.
Read more about widgets here.
Video Overview
Slash Commands
Type / anywhere in the editor to insert widgets and blocks:
Command
Description
/image
Insert an image
/gallery
Insert an image gallery
/youtube
Embed a YouTube video
/tweet or /twitter
Embed a tweet/X post
/embed
Embed content (Instagram, TikTok, etc.)
/cta or /button
Add a call-to-action button
/callout
Add a callout/notice box
/post
Insert a post card link
/table
Insert a table
/code
Insert a code block
/markdown
Insert markdown content
/divider or /hr
Insert a horizontal divider
Keyboard Shortcuts
Shortcut
Action
Cmd/Ctrl + B
Bold
Cmd/Ctrl + I
Italic
Cmd/Ctrl + U
Underline
Cmd/Ctrl + Shift + S
Strikethrough
Cmd/Ctrl + K
Insert/Edit link
Cmd/Ctrl + Z
Undo
Cmd/Ctrl + Shift + Z
Redo
Markdown Support
The editor supports markdown shortcuts as you type:
Type this
To get
# Heading
Heading 1
## Heading
Heading 2
### Heading
Heading 3
**bold**
bold
*italic*
italic
~~strikethrough~~
strikethrough
`code`
inline code
```
Code block
- item or * item
Bullet list
1. item
Numbered list
> quote
Blockquote
---
Horizontal divider
This blog is powered by Superblog. Visit https://superblog.ai to know more.
Why the post's meta title is changed in Google search results?
Author: Sai Krishna Author URL: https://superblog.ai/docs/author/sai-krishna Published: 2025-12-19 Category: FAQ Category URL: https://superblog.ai/docs/category/faq URL: https://superblog.ai/docs/why-the-posts-meta-title-is-changed-in-google-search-results
Yes, Google rewrites them. That's why it is different from what you see in search results vs what you set in your superblog dashboard.
https://www.searchenginejournal.com/google-changes-more-than-61-percent-of-title-tags/435618/
This blog is powered by Superblog. Visit https://superblog.ai to know more.
Settings
Author: Sai Krishna Author URL: https://superblog.ai/docs/author/sai-krishna Published: 2025-12-16 Category: Dashboard Category URL: https://superblog.ai/docs/category/dashboard Meta Description: View Dashboard > Settings URL: https://superblog.ai/docs/dashboard-settings
Settings
View Dashboard > Settings
You can customize your Superblog in almost every aspect possible. There are some sane restrictions in place to make sure that the user experience and reading experience are not compromised.
Settings are divided into sections for easier use.
-
General
-
Design
-
Homepage
-
Menu
-
SEO
-
Multilingual
-
Integrations
-
Advanced
Each section has various options that are pretty self-explanatory. You can find common settings to customize template, colors, names, labels, translations, redirects, robots.txt custom JavaScript, custom CSS and a bunch of other things here.
This blog is powered by Superblog. Visit https://superblog.ai to know more.
Team
Author: Sai Krishna Author URL: https://superblog.ai/docs/author/sai-krishna Published: 2025-12-16 Category: Dashboard Category URL: https://superblog.ai/docs/category/dashboard Meta Description: --> URL: https://superblog.ai/docs/dashboard-team
Team
View Dashboard > Team
Superblog has excellent team module to make managing your blog easier. You can assign different role to different members of your team. The total number of members you can have in your team depends on the plan you are on.
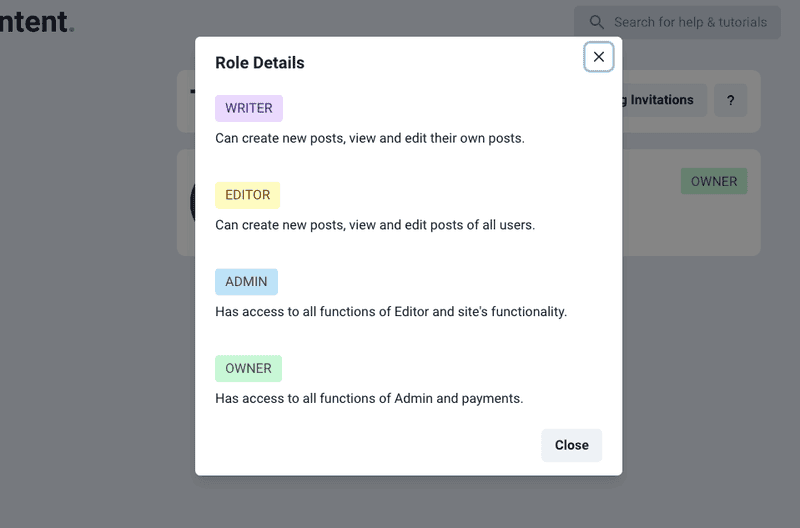
Roles
There are 4 roles available in Superblog.
- Writer
- Editor
- Admin
- Owner
Writer
A team member who has given the role of Writer can ONLY create new posts, view and edit their own posts. They cannot change the settings of your Superblog or access the payment plan. There can be multiple writers in a team.
Editor
A team member who has given the role of Editor can create new posts, view and edit posts of all the members of your team. They cannot change the settings of your Superblog or access the payment plan. There can be multiple editors in a team.
Admin
A team member who has given the role of Admin can create new posts, view and edit posts of all the members of your team. They CAN change the settings of your Superblog but CAN NOT access the payment plan. They can invite new team members, edit the role of existing team members, and also remove them. There can be multiple admins in a team.
Owner
The user who creates a Superblog is assigned the role of OWNER by the system. Owner can create new posts, view and edit posts of all the members of your team. They CAN change the settings of your Superblog and CAN access the payment plan. There can only be ONE owner in a team.
Invite team member
View Dashboard > Team > Invite Team Member (button)
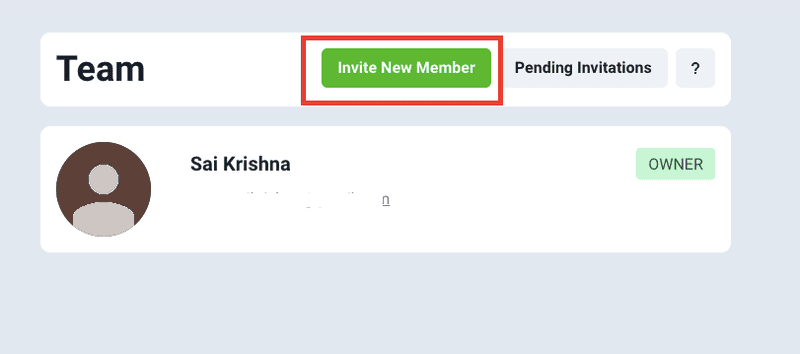
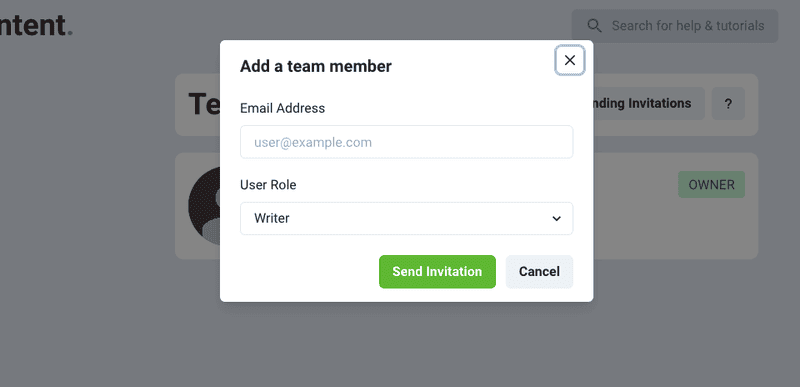
Admin or Owner can add a new team member by sending them an email invitation. Click on the Invite New Member button to see a popup.
- Enter their email address
- Select a role
- Click the Send Invitation button
Superblog will send them an email invitation with a link to confirm. The intended user has to click on the link that they received in the email and login to Superblog with the same email address. That's it! They become a part of your team.
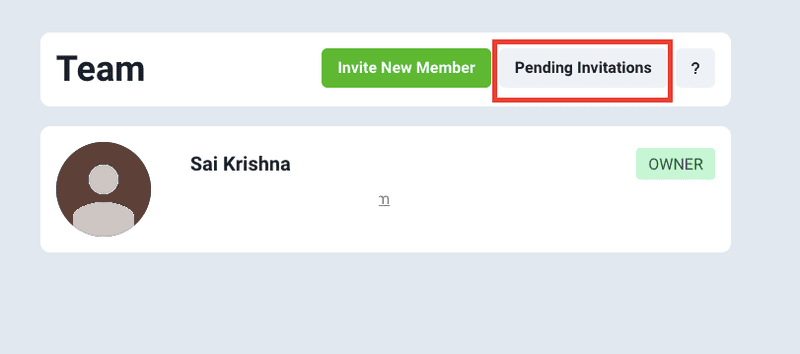
Cancel a sent invitation
If you want to cancel an invitation to an email address then click on "Pending Invitations" button to find the invitation and delete it.
Edit the Role of a team member
Admin or Owner can edit the role of a team member by visiting the Team section and clicking the Edit button.
Remove a team member
Admin or Owner can remove a team member by visiting the Team section and clicking the Remove button.
If a user is removed, all their posts are assigned to the owner.
This blog is powered by Superblog. Visit https://superblog.ai to know more.
MCP Integration
Author: Sai Krishna Author URL: https://superblog.ai/docs/author/sai-krishna Published: 2025-12-16 Category: MCP Category URL: https://superblog.ai/docs/category/mcp Meta Description: Control your Superblog using AI engines like Claude, ChatGPT, and other AI assistants that support the Model Context Protocol (MCP). URL: https://superblog.ai/docs/mcp-intro
Control your Superblog using AI engines like Claude, ChatGPT, and other AI assistants that support the Model Context Protocol (MCP).
Prerequisites
-
You should be on the SUPER plan.
-
An AI client that supports MCP (e.g., Claude Desktop, Claude Code).
Adding the MCP Server
- Run the following command to add the Superblog MCP server in your Terminal.
claude mcp add --transport http superblog https://write.superblog.ai/api/mcp
- Then enter 'claude' in your terminal and ask 'show my superblogs'.
What You Can Do
Once connected, you can use natural language to:
-
List, write, and, edit posts
-
Manage and schedule blog posts
-
Manage categories and tags
-
Internal link suggestions
-
Other actions shown in MCP list
Pro Tip
You can give superblog's OpenAPI doc to your AI for more context and to get better results.
This blog is powered by Superblog. Visit https://superblog.ai to know more.
Data
Author: Sai Krishna Author URL: https://superblog.ai/docs/author/sai-krishna Published: 2025-12-16 Category: Dashboard Category URL: https://superblog.ai/docs/category/dashboard Meta Description: View Dashboard > Data URL: https://superblog.ai/docs/dashboard-data
Data
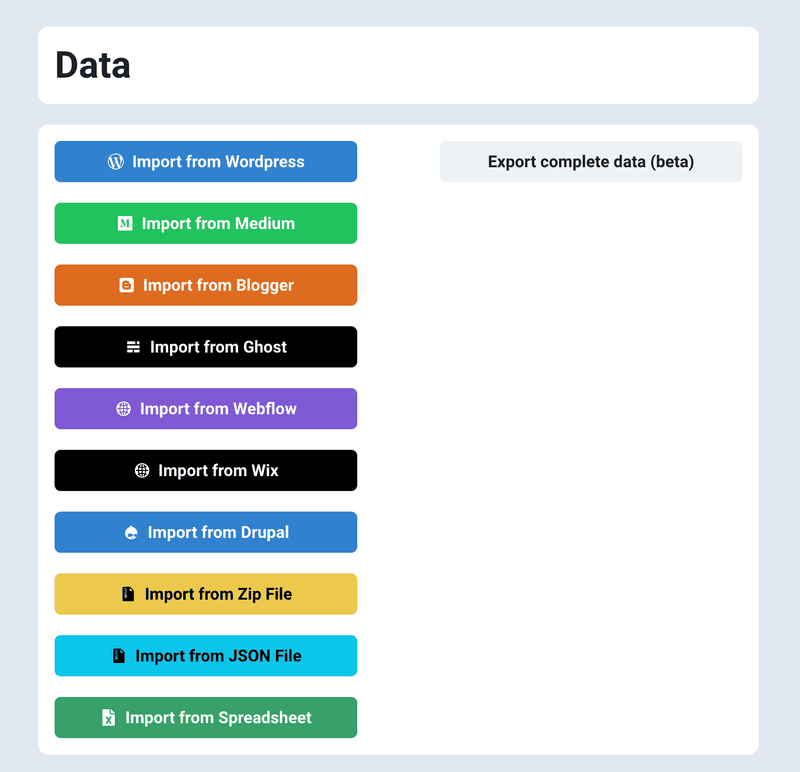
View Dashboard > Data
All things related to your Superblog's data like import, export, and API keys are found this section.
Migrate/Import posts
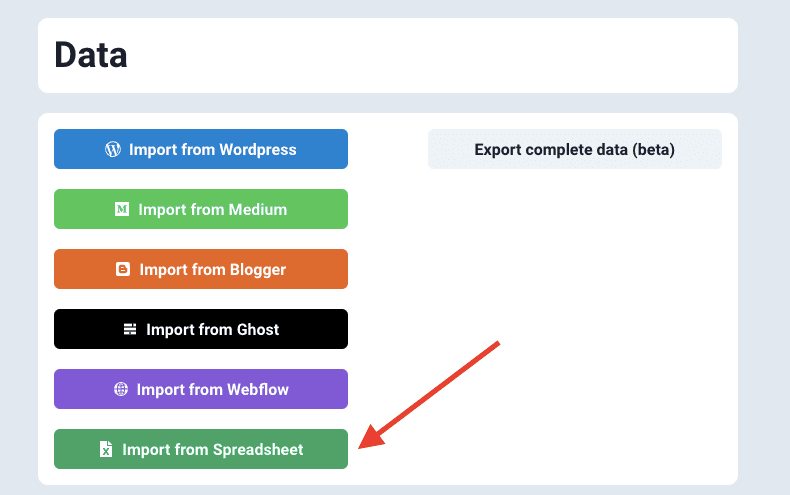
You can migrate your blog from existing platforms like WordPress, Ghost, Webflow, Blogger, Medium, Drupal, Spreadsheets, Zip files, etc. easily with one click. All your existing posts, tags, url-slugs are imported automatically.
However if you want to optimize the images and store them in Superblog CDN automatically then you need to run the migration after upgrading to a paid plan.
Superblog will gracefully try to migrate your exisitng content to suit into superblog format. Your existing URLs will NOT change. So, you don't need to worry about SEO and backlinks. All the standard HTML elements will be preserved. However you are advised to check the migrated content to ensure it is as expected.
Migrate From WordPress
You can import your existing WordPress posts to Superblog in less than 2 minutes with one click.
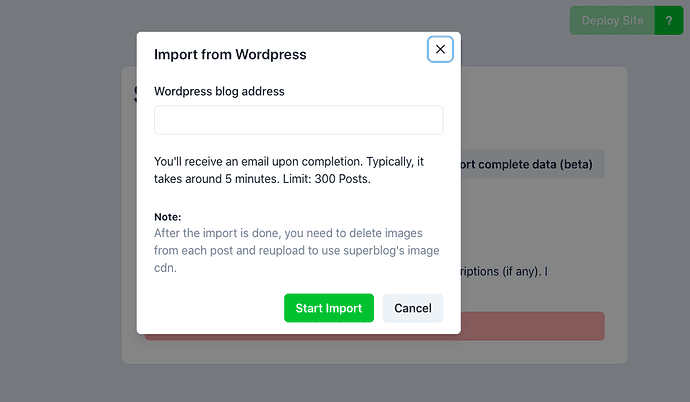
-
Create a Superblog.
-
Visit your Dashboard by clicking ‘View Dashboard’.
-
Click ‘Data’ in the left sidebar.
-
Click the ‘Import from WordPress' button in the ‘Data’ section.
-
Now, you will see a popup asking you to enter your WordPress blog’s URL.
-
You need to give the URL of your WordPress installation and not the vanity URL of the blog.
Note
For example, if your WordPress installation is at the root URL of your domain called mysamplesite.com then enter http://mysamplesite.com (if you have SSL, then https).
Some people might be confused about it because they have their blog at mysamplesite.com/blog and tend to enter that URL. Always enter the URL of your WordPress installation as mentioned above.
Special cases
-
Sometimes, your root domain will be mysamplesite.com and your WordPress is installed in mysamplesite.com/blog. Then you need to enter https://mysamplesite.com/blog.
-
If your WordPress is installed at https://blog.mysamplesite.com then enter https://blog.mysamplesite.com.
Migrate From Ghost
You can import your existing Ghost posts to Superblog in less than 2 minutes with one click.

-
Create a Superblog.
-
Visit your Dashboard by clicking ‘View Dashboard’.
-
Click ‘Data’ in the left sidebar.
-
Click the ‘Import from Ghost' button in the ‘Data’ section.
-
Enter your blog’s URL, Content API Key, Select Ghost’s API Version, and click the “Start Import” button.
Note
You can get your Content API key from Ghost's admin panel.
-
Login to your Ghost blog's admin planel.
-
Click "Integrations" in the sidebar.
-
Create a new "Custom Integration" to receive your Content API key.
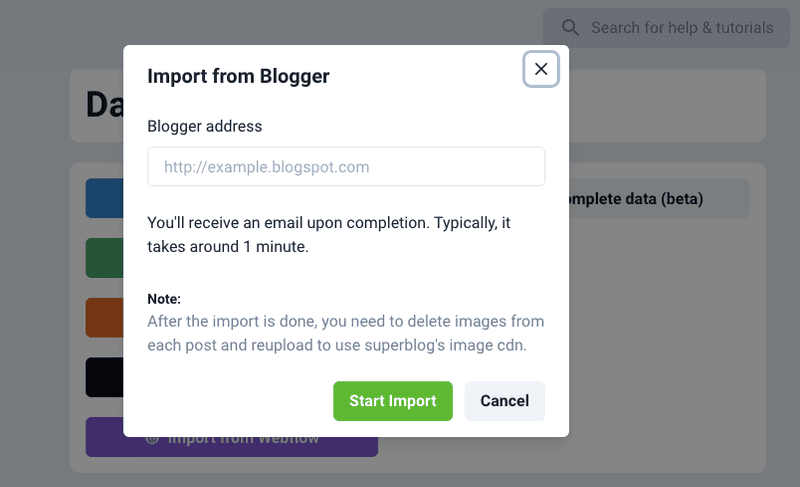
Migrate From Blogger
You can import your existing Blogger posts to Superblog in less than 2 minutes with one click.
-
Create a Superblog.
-
Visit your Dashboard by clicking ‘View Dashboard’.
-
Click ‘Data’ in the left sidebar.
-
Click the ‘Import from Blogger' button in the ‘Data’ section.
-
Enter your blog’s URL and click the “Start Import” button.
Migrate From Webflow
You can import your existing Webflow posts to Superblog in less than 5 minutes with one click.

-
Create a Superblog.
-
Visit your Dashboard by clicking ‘View Dashboard’.
-
Click ‘Data’ in the left sidebar.
-
Click the ‘Import from Webflow' button in the ‘Data’ section.
-
Enter your blog’s URL and click the “Start Import” button.
Now, you will see a popup asking you to enter your Webflow details. They are explained below.
API key
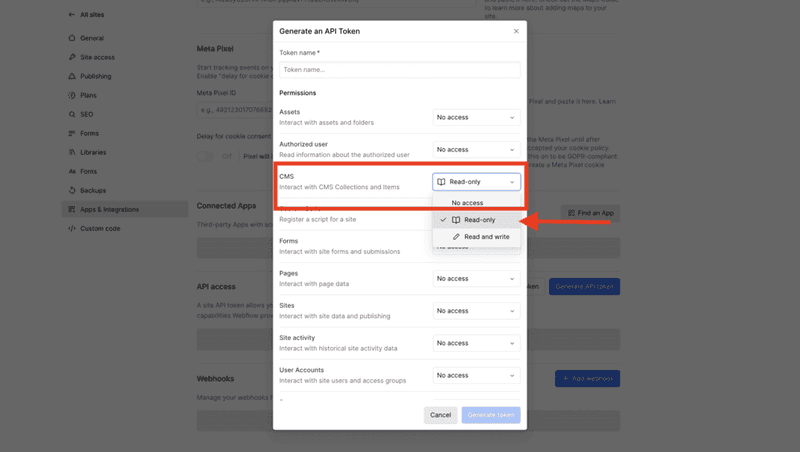
-
Visit your Webflow Dashboard.
-
Go to your site>settings>"Apps & Integrations".
-
Scroll down to see the “Generate new API token” button and click it. (always choose v2 token)
-
Select "CMS" field and choose "Read-only" access.
-
Give your token a name and click "Generate" button.
-
Copy-paste the API token in the above form.
Post Collection Id
You might have created a CMS collection to write posts on your webflow site. You can visit the CMS section of your webflow site and find the ID in the settings.

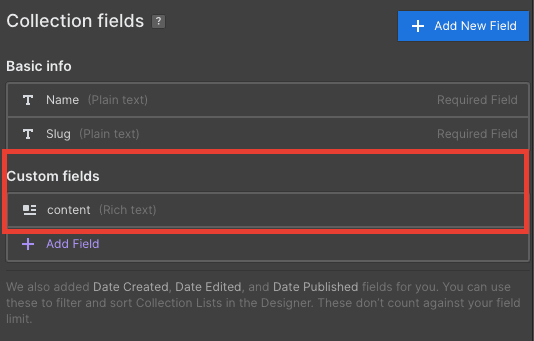
Post Body Field
You might have created the Post model with certain fields in Webflow CMS. You need to enter the name of the field that holds the content of your post during migration.
For example, I created a “content” field to hold the post's body/text/html in my CMS. It could be “post-body”, “post-content”, etc in your CMS depending on who created it.
Migrate From Medium
You can import your existing Medium posts to Superblog in less than 2 minutes with one click.

-
Create a Superblog.
-
Visit your Dashboard by clicking ‘View Dashboard’.
-
Click ‘Data’ in the left sidebar.
-
Click the ‘Import from Medium' button in the ‘Data’ section.
-
Now, you will see a popup asking you to upload your Medium archive data zip.
-
Upload the zip file and click the "Start Import" button.
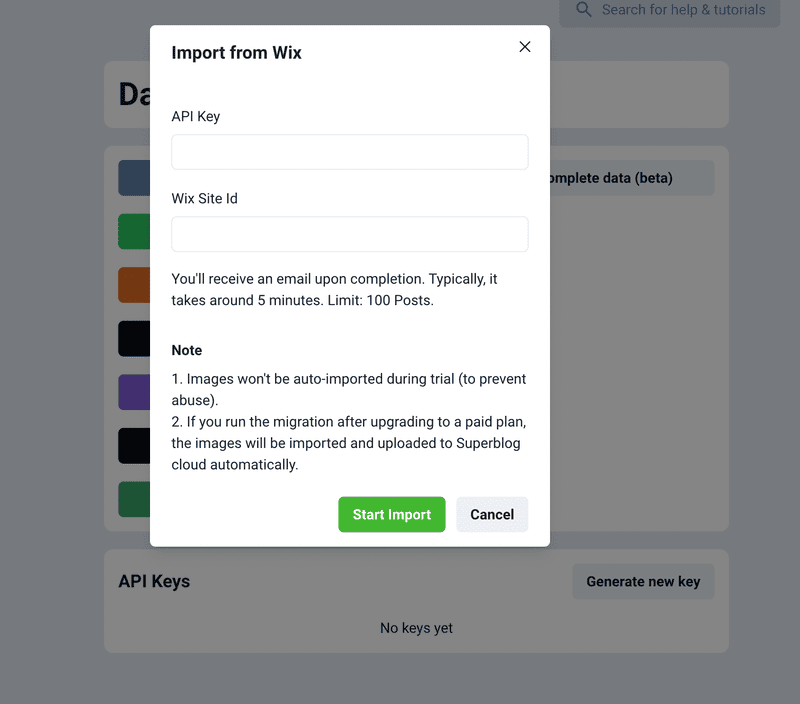
Migrate From Wix
You can import your existing Wix posts to Superblog in less than 2 minutes with one click.
-
Create a Superblog.
-
Visit your Dashboard by clicking ‘View Dashboard’.
-
Click ‘Data’ in the left sidebar.
-
Click the ‘Import from Medium' button in the ‘Data’ section.
-
Now, you will see a popup asking you to enter your API key and Wix Site Id.
-
Enter your Wix API key and Site Id as shown here.
-
Click the "Start Import" button.
Note
-
Site Id will be in this format
xxxxx-a6ab-4e17-ae17-klm9dfb4e79d. -
Wix API Key will be a huge string like below
IST.xxxxxxxxxxxxxxxxxxx.eyJkYXRhIjoie1wiaWRcIjpcIjFmNTAzMjZkLTE5MzEtNDcwMS04ZTZlLTU3N2U4MzE4NzYzMVwiLFwiaWRlbnRpdHlcIjp7XCJ0eXBlXCI6XCJhcHBsaWNhdGlvblwiLFwiaWRcIjpcImI5MWNmNzRhLWNkYjgtNDg5My04OTcyLWJlZTM1MzkwY2Y2NFwifSxcInRlbmFudFwiOntcInR5cGVcIjpcImFjY2MbB73oMrFJ9kugCTDOLu7GtKjPsv-Nhp51QNslYL_E8X7_OmaFRXPzn3FRwFvAoIjDLxCfWZLlGXtZruggi5ca-TP8lANjKnVfELWPAJVY1FRp5LS5h33GW3TyqTx_gsGftvHllcL_keagVs_E5-b2_BTYXvuzovk1-EIuBeJRQeTbLw6nUQiK5bOkBTyt6rWzb_jp3LzDlswkcL5tq2s8g
Migrate from Custom CMS
If you are using a CMS like strapi or contentful or any other custom CMS then you can export your posts into JSON file.
Then use the process as explained here.
Import from Spreadsheet
You can import upto to 300 blog posts from Spreadsheet into Superblog in less than 2 minutes with one click.
-
You can have the content of the blog post written in HTML or Markdown.
-
The formatting of the content is retained.
-
You need to be on a paid plan to use this feature.
-
The spreadsheet can be of xlsx, csv or xls format.
-
The spreadsheet should strictly be of this format: https://write.superblog.ai/files/import-sample.xlsx
Spreadsheet format
Your spreadsheet should contain the following columns:
-
Title: This is the title of the post
-
Content: This is the content of the post. It can be in HTML or Markdown format.
-
Markdown: If the content column is in Markdown format, it should be "YES" otherwise "NO" (without quotes).
-
Published: If you want the post to be published, it should be "YES" otherwise "NO" (without quotes).
-
Date: This is the date of publishing of the post. Format: 9/13/2022 12:30:00 PM GMT+5:30
-
Slug: This is the url of the post. Example: how-to-write-a-blog-post-in-2024
-
Tags: This is the list of tags seperated by comma that you want to assign for the post. Ex: Tips, Tech, Tutorial
-
Meta Title (optional): This is the meta title of the page.
-
Meta Description (optional): This is the emta description of the page.
-
Schedule DateTime (optional): You can schedule posts via spreadsheet. You can mention a date that is in future so that the posts are imported but not published. Format: 9/13/2022 12:30:00 PM GMT+5:30
-
Disable Auto ToC (optional): If you want to disable auto-ToC, it should be "YES" otherwise "NO" (without quotes).
-
Thumbnail URL (optional): You can assign thumbnails to your posts if you add a link to the thumbnail image here. Example: https://upload.wikimedia.org/wikipedia/en/a/a9/Example.jpg
Migrate from Shopify
Direct Shopify storefront import is not available right now.
For Shopify blogs, export your posts as a CSV or JSON file first.
Then import that exported file using one of these existing options in Superblog:
-
Spreadsheet -
JSON File
This is the recommended Shopify workflow because it is more predictable and easier to review before publishing.
Before importing:
-
export the Shopify blog content from your current workflow or app
-
make sure your export includes fields such as title, content, slug, tags, description, image, and publish state where available
-
use Superblog's file import mapping if your column names differ from the expected schema
This keeps Shopify migrations aligned with the file-based import tools that already exist in the dashboard.
Import from JSON file
If you have your blog posts in a JSON file then you can import them directly superblog.
How to
-
Your JSON file should not have any formatting errors. It should be parsable by
JSON.parse()method. -
It should contain an array of posts with fields like title, content, category, tags, etc.
-
You can import 300 blog posts in one go.
Blog Post Schema Details
-
Title
- Description: The title of the blog post. It is a mandatory string field.
-
Content
- Description: The main body content of the blog post. It's a mandatory string field.
-
isPublished
- Description: A boolean indicating whether the post is published or not. If true, the post is visible to the public.
-
isMarkdown
- Description: An optional boolean field indicating whether the content is written in Markdown format.
-
createdAt
- Description: The creation date of the post. It must be a valid date string.
-
publishedAt
- Description: The date when the post was published. This must be a valid date string.
-
updatedAt
- Description: Reflects the last update date of the post. This must be a valid date string.
-
category (optional)
- Description: A field for categorizing the post. Useful for filtering posts by category on a blog platform.
-
tagNames (optional)
- Description: An array of strings, where each string is a tag related to the blog post. Tags help in organizing content and improving the discoverability of related posts.
-
slug (optional)
- Description: A string used as the URL slug for the post. This should be a URL-friendly version of the title or a custom string that helps in SEO.
-
metaTitle (optional)
- Description: A string used as the SEO title of the page. This is what will typically be displayed in search engine results and browser tabs.
-
metaDescription (optional)
- Description: A string that provides a brief summary of the post for SEO purposes. This description appears under the title in search engine results.
-
customFeaturedImageUrl (optional)
- Description: A URL to a custom image for the post. This can be used as a featured image in listings or headers.
Sample JSON file
[{"title":"Understanding Zod for Schema Validation","content":"<p>Zod is a powerful library that simplifies the process of validation in JavaScript applications...</p>","isPublished":true,"isMarkdown":false,"createdAt":"2024-04-20T14:48:00.000Z","publishedAt":"2024-04-21T00:00:00.000Z","updatedAt":"2024-04-21T12:00:00.000Z","category":"Programming","tagNames":["JavaScript","Validation","Zod"],"slug":"understanding-zod-validation","metaTitle":"Understanding Zod for Schema Validation","metaDescription":"An in-depth guide on how to use Zod for schema validation in JavaScript.","customFeaturedImageUrl":"https://example.com/images/zod.png"},{"title":"Advanced Techniques in React","content":"# What is React? React offers a plethora of advanced techniques that can help developers optimize their applications...","isPublished":false,"isMarkdown":true,"createdAt":"2024-04-19T09:30:00.000Z","updatedAt":"2024-04-20T08:45:00.000Z","publishedAt":"2024-04-20T08:45:00.000Z","category":"Web Development","tagNames":["React","Web Development","Frontend"],"slug":"advanced-react-techniques","metaTitle":"Advanced Techniques in React","metaDescription":"Learn about advanced techniques in React to improve your web development skills.","customFeaturedImageUrl":"https://example.com/images/react.png"},{"title":"Introduction to Svelte","content":"<p>Svelte is a radical new approach to building user interfaces. Unlike traditional frameworks...</p>","isPublished":true,"createdAt":"2024-04-18T07:20:00.000Z","publishedAt":"2024-04-20T10:15:00.000Z","updatedAt":"2024-04-20T11:30:00.000Z","category":"Frontend Technologies","tagNames":["Svelte","JavaScript","UI"],"slug":"intro-to-svelte","metaTitle":"Introduction to Svelte","metaDescription":"Discover Svelte, a new way to build efficient, fast, and reactive web interfaces.","customFeaturedImageUrl":"https://example.com/images/svelte.png"}]
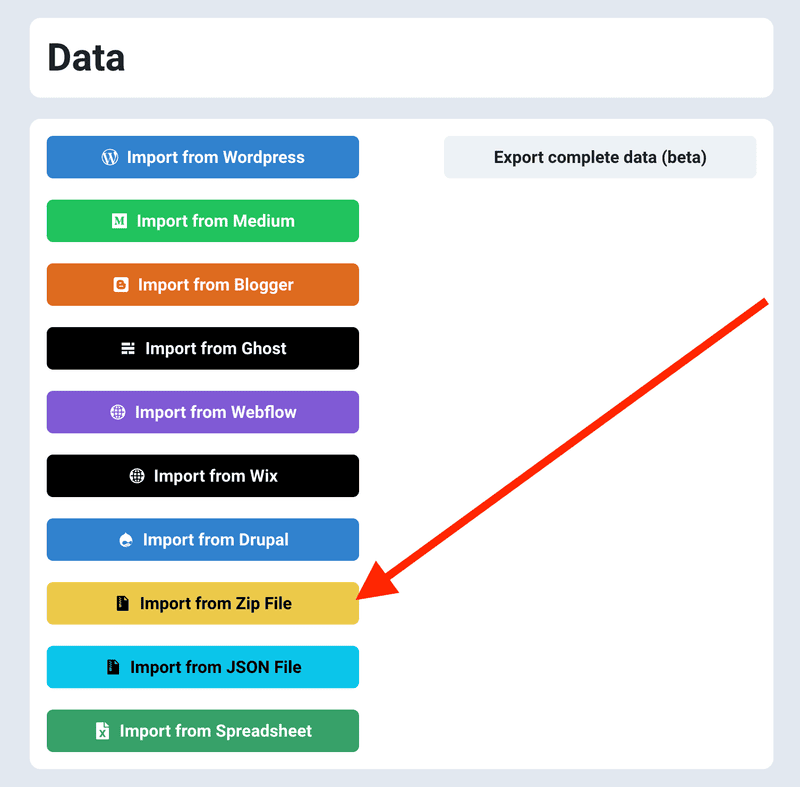
Import from Zip file
You can import upto to 300 blog posts from a zip file into Superblog in less than 2 minutes with one click.
-
The zip file can contain .html or .md files.
-
If there any image URLs in the posts, they will be automatically downloaded and uploaded to superblog CDN for maximum performance. (only on paid plans)
-
This feature is available only in SUPER and higher plans.
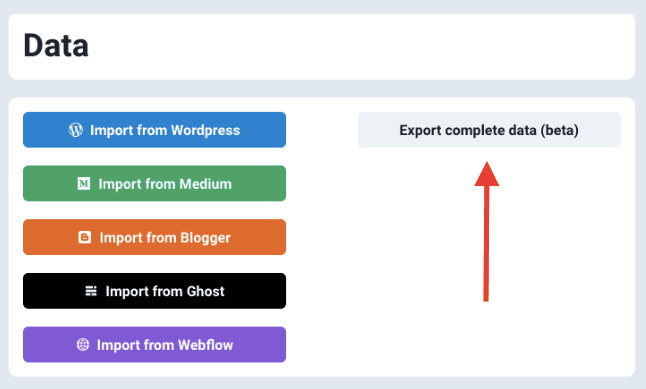
Export Superblog data
You can export your complete Superblog data like posts, tags, categories, authors in case you want to move out of Superblog at any point of time. The data is downloaded as a JSON file. You can convert the JSON file to CSV file and import it into your favorite CMS.
You can then use the JSON file to import in WordPress using JSON-importer plugin. Or you can use the JSON file programmatically in any CMS. However you need to download the images manually at this point of time.
Here is a tutorial to import superblog data into WordPress. The PRO version of this plugin will automatically download the images.
Note: Only delete your superblog after you confirm the data migration.
API Keys
You need to be on PRO or higher plan to use this feature. API keys are useful if you want to manage your Superblog via API.
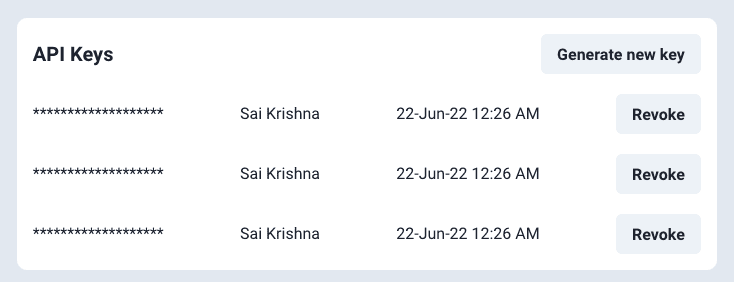
-
Click on the 'Generate API key' button to generate a new API key.
-
Copy the code somewhere safe, because you will be able to see it ever again.
-
Click on the "Revoke" button to invalidate the API key.
This blog is powered by Superblog. Visit https://superblog.ai to know more.
Plan
Author: Sai Krishna Author URL: https://superblog.ai/docs/author/sai-krishna Published: 2025-12-16 Category: Dashboard Category URL: https://superblog.ai/docs/category/dashboard Meta Description: View Dashboard > Plan URL: https://superblog.ai/docs/dashboard-plan
View Dashboard > Plan
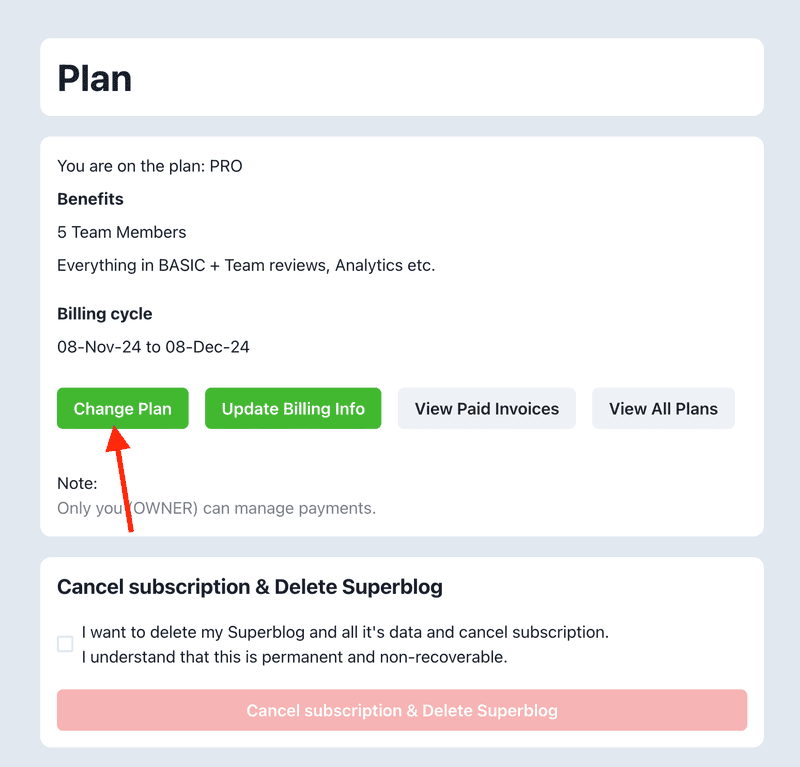
Change Plan
You can see the details of your paid plan in this section. (Only the OWNER of the superblog can see this section)
By clicking the Change Plan button you will be taken to Stripe portal to upgrade/downgrade your plan. You can also download invoices and change your card details.
Stripe is one of the most secure and famous payments providers. We partnered with Stripe for safe billing. Your secure details are never stored on our server.
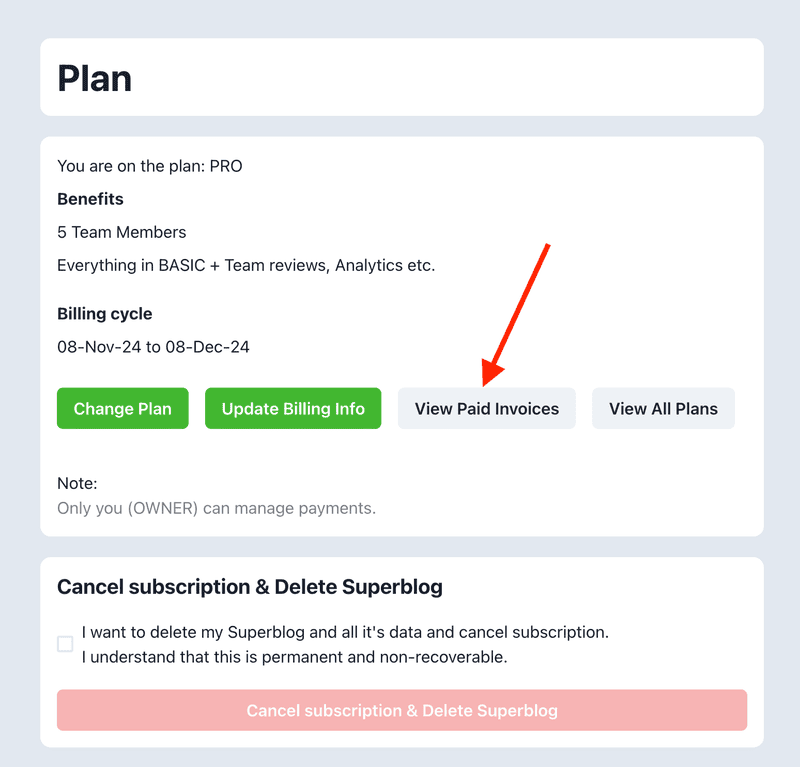
View & Download Invoices
You can view and download your invoices by clicking the "View Paid Invoices" button as seen in the above picture.
Update Address and Billing information
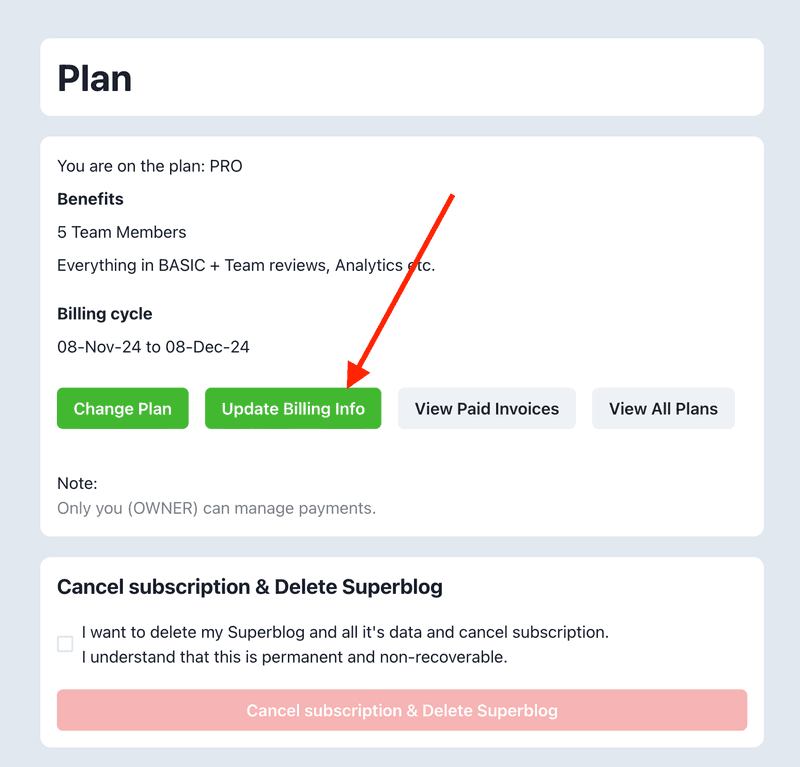
You can view and edit your address, billing information by clicking the "Update Billing Info" button as seen in the above picture.
TAX ID / VAT / GST
You can add your appropriate TAX ID like VAT or GST by editing your billing information. Afterwards, all your invoices will contain the TAX ID.
Also, you can select "Purchase as a business" option while purchasing superblog subscription to get invoices on your company name with TAX ID.
Delete Superblog & Cancel Subscription
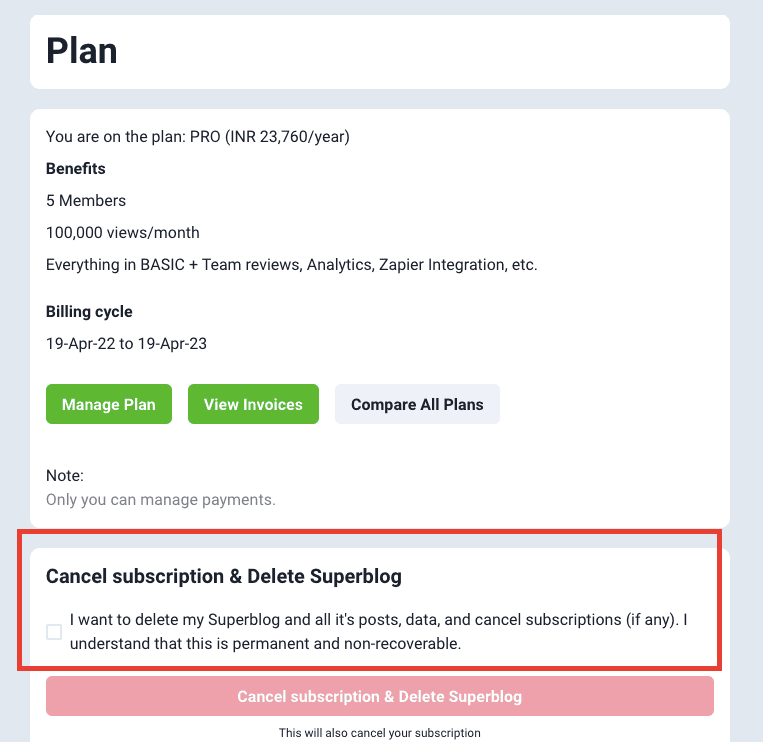
We are sorry to see you go! If you think that we can make your experience better, please write to: [email protected].
How to delete
- Login to superblog. https://write.superblog.ai
- Click ‘View Dashboard’ on your blog.
- In the sidebar, click Plan.
- Now, you can see the ‘Delete’ button.
- Once you confirm the deletion, your superblog is deleted.
- If you have any active subscription, it’ll be cancelled.
Note
Be sure to back up your blog’s entire data beforehand from the data page.
Refunds
You can cancel your subscription anytime.
In the case of yearly plans, you will get a refund on a pro-rata basis excluding the month of cancellation and payment gateway’s charges. Please write to [email protected] after cancelling to get the refund.
In the case of monthly plans, you won’t get any refund.
This blog is powered by Superblog. Visit https://superblog.ai to know more.
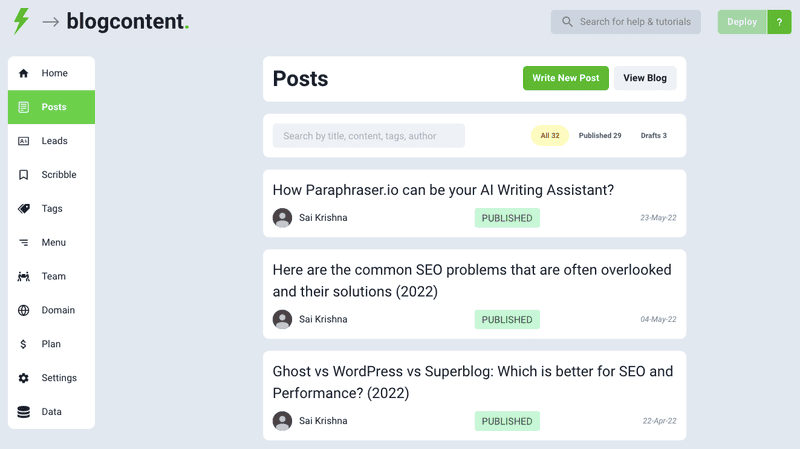
Posts
Author: Sai Krishna Author URL: https://superblog.ai/docs/author/sai-krishna Published: 2025-12-16 Category: Dashboard Category URL: https://superblog.ai/docs/category/dashboard Meta Description: View Dashboard > Posts URL: https://superblog.ai/docs/dashboard-posts
Posts
View Dashboard > Posts
You can write new posts and edit existing posts from here. Click on the "Write New Post" button or any post to go the editor.
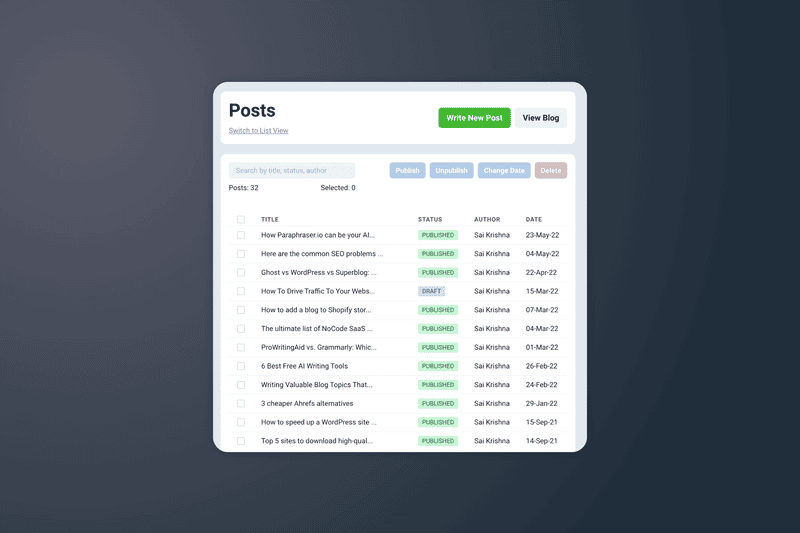
Bulk View
You can browse your posts in a table format via bulk view.
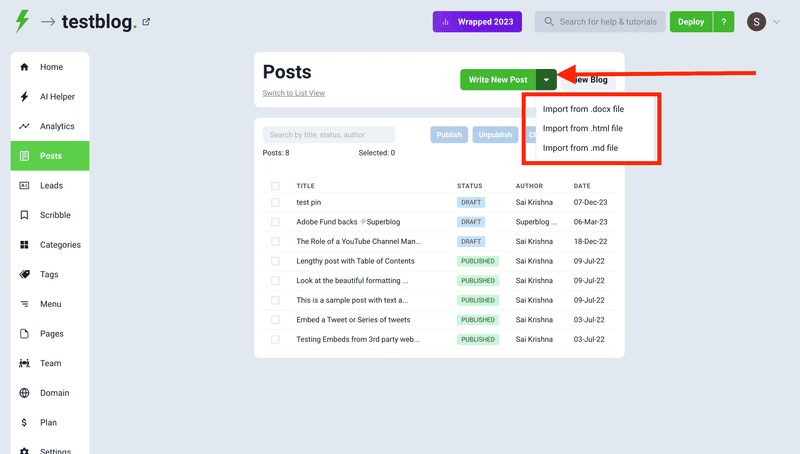
Import Post
You can import post from .docx, .html, and .md files. This feature is handy if you want to write your blog posts in Google Docs, Notion, or Markdown. Simply export your post as html or docs or markdown format from anywhere and import into superblog in one click.
Editor
Superblog has a very advanced editor that helps you write SEO-focused content with certain restrictions for sanity. All the content you see is when you write is rendered exactly on your Superblog. This is a WYSIWYG editor and that's why no preview is required.
Features
- Text formatting - Normal, Heading, Subheading, Quote, Code
- Text style - Bold, Italic,
- List - Numbered, Normal
- Anchor links - can open in new tab
- Schedule Posts
- Upload images
- Insert videos links from Youtube/Vimeo
- Align text - left, right, center, justified
- Paragraph seperator
- Table of Contents (ToC) - can autogenerate a table of contents from the content
- Code view - you can edit the html directly
- Callout CTA section
Publish post
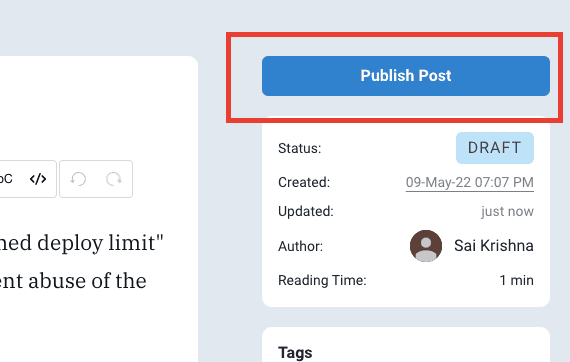
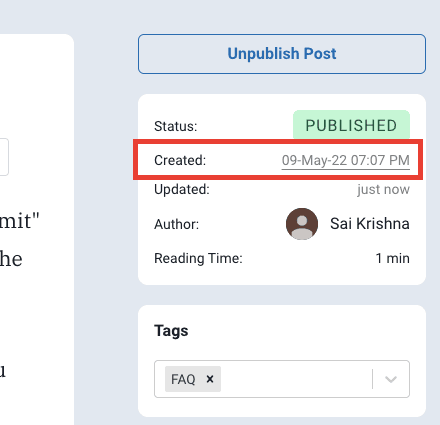
You can find the "Publish Post" button on the right side to the editor if a post is not published already. Click it to publish the post. (You can see its status below the action button)
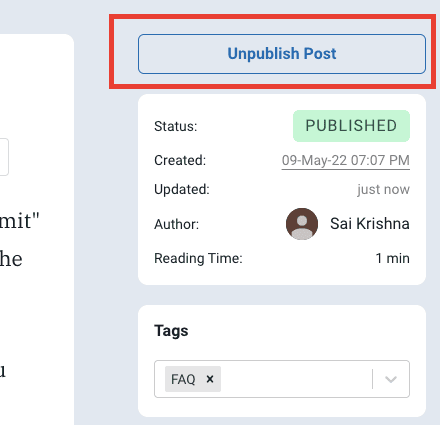
Unpublish post
You can find the "Unpublish Post" button on the right side to the editor if a post is published already. Click it to unpublish the post anytime. (You can see its status below the action button)
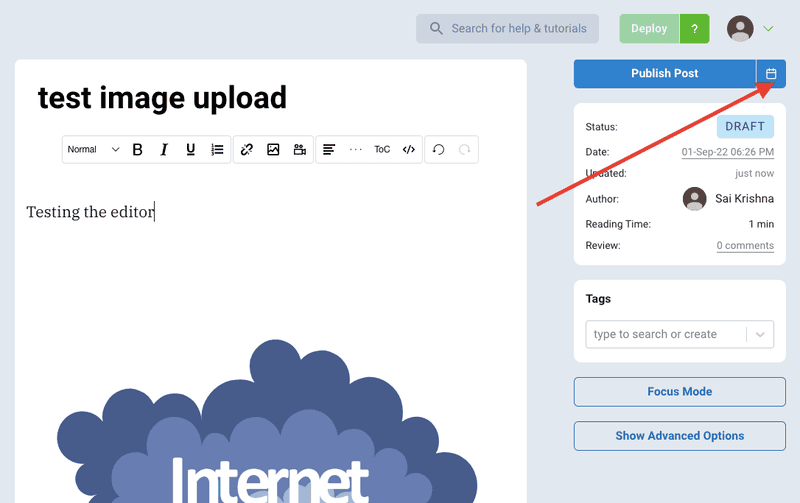
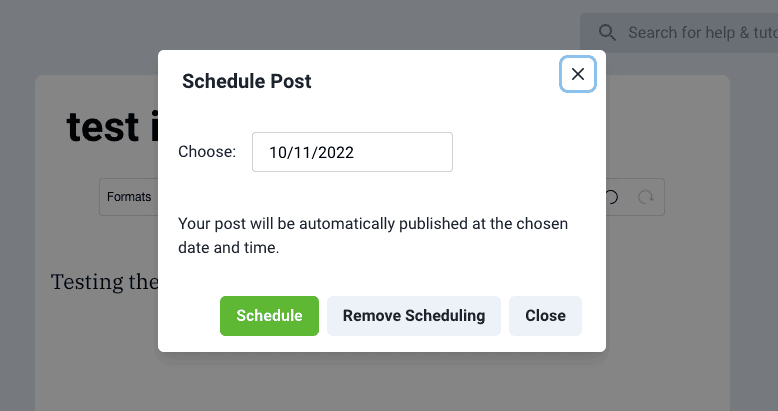
Schedule post
You can find the "Calender Icon" button on the right side to the editor to schedule a post.
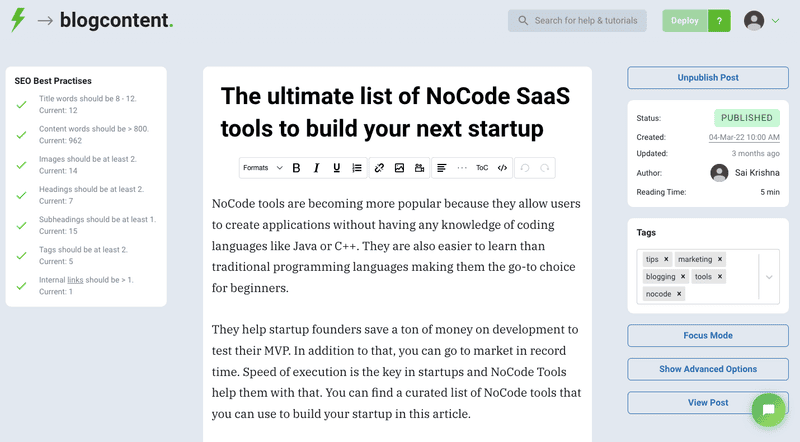
SEO best Practices
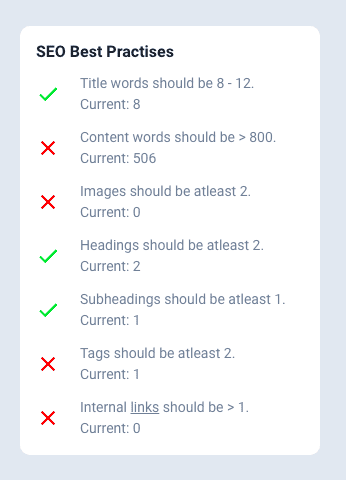
You might have noticed the SEO Best Practices section on the post editor page. They are opiniated guidelines to make your post rank better on search engines. Let us try to understand more.
Title
This is the title of the post. Make sure your post’s title is around 8-12 words and has your post’s keyword.
Content
This is the contents of your post.
Images
Always include images in your posts. A picture is worth 1000 words.
Headings
Format your content properly. You need to have at least two headings. Write a catchy sentence to explain the section of your post and use the “Heading” format from the toolbar. Internally superblog will convert a heading to h2 which is good for SEO.
Subheadings
Format your content properly. You need to have at least 1 subheading. “Subheading” format from the toolbar. Internally superblog will convert a heading to h3 which is good for SEO.
Tags
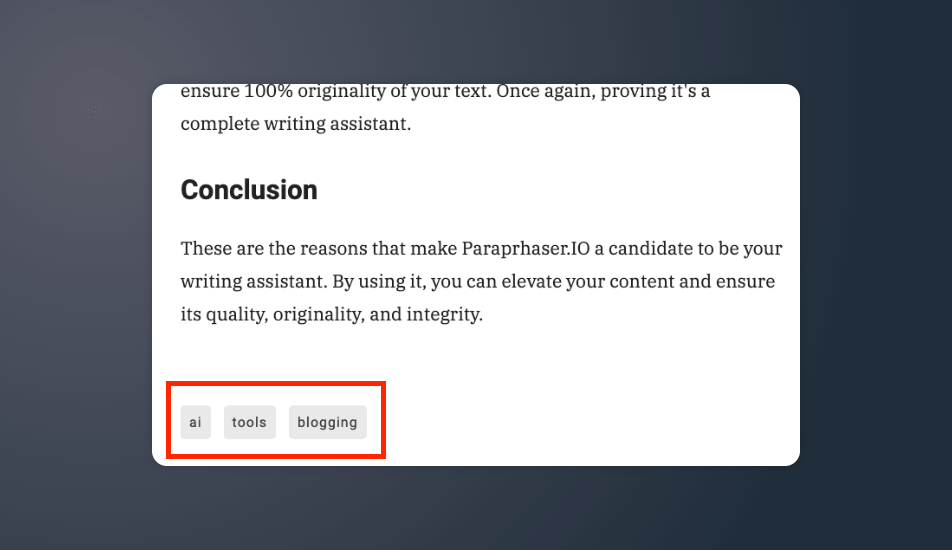
You need to tag your post with relevant topics. For example, if you are writing a post on “Impact of covid in 2021 on health care industry” then you use tags like covid, healthcare, planning etc.
You can add the tags from the right-side “tag” editor.
Internal links
This is a very high-level SEO concept. All your blog posts should link to each other. So, make sure that you add a link to posts on your blog.
For example, let us assume you have a post on your blog with the topic of “Understanding economics of scale”. If you are writing a new post with the topic of “Scaling a business with 3 proven ways” then make sure you add a link to your previous post.
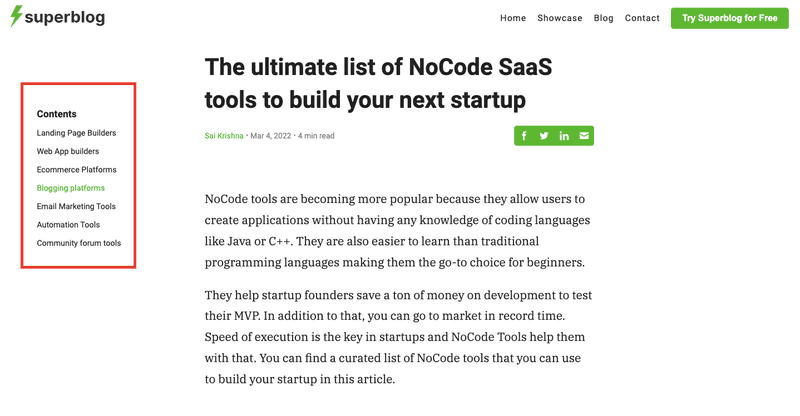
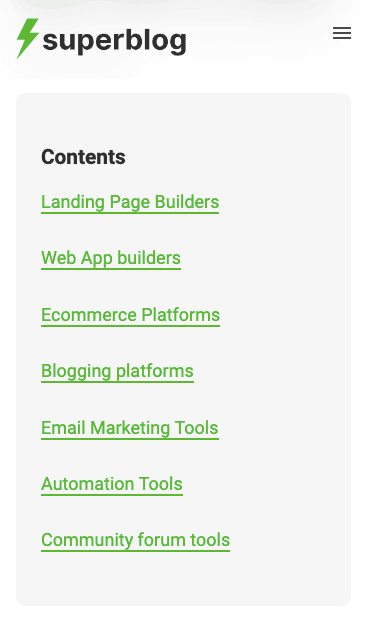
Table of Contents (TOC)
Sometimes you might have a lengthy post. Or may be you just need to structure the post with headings, subheadings, and provide a glance of the post's content. Superblog has this functionality built-in.
Superblog generates a ToC for every post that has Headings(h2) and Subheadings(h3) automatically. But superblog only shows h2 in the ToC container by default. You do not need to perform any action for to enable this. The ToC is placed at the top left of the blog post on desktops and at the beginnning of the post's body in mobiles.
If you want to disable the ToC on any post, you can do so from the "Advanced Options" of each post. You can also control this setting globally via "Settings > Expert"
Desktop
Mobile
Change the date of creating/publishing
You can change the date of creating/publishing a post by clicking the "Date" of the post in the right side section.
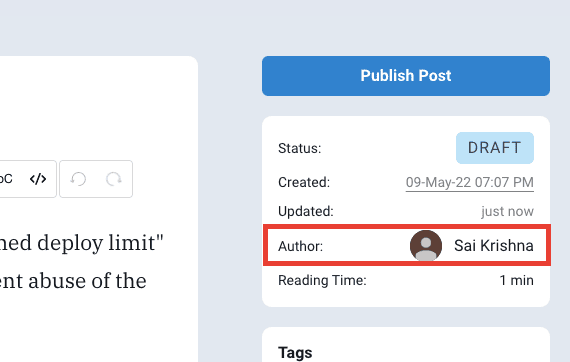
Change the post author
You can change the author of a post by clicking the "Author Name" of the post in the right side section. You can assign the post to any member of your team. This can be done only by the users with roles of "OWNER", "ADMIN", or, "EDITOR".
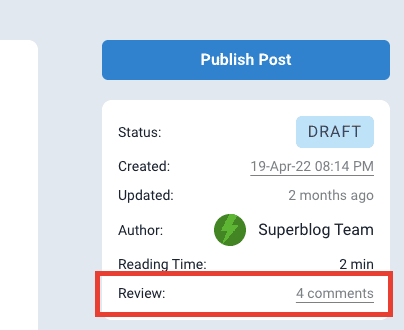
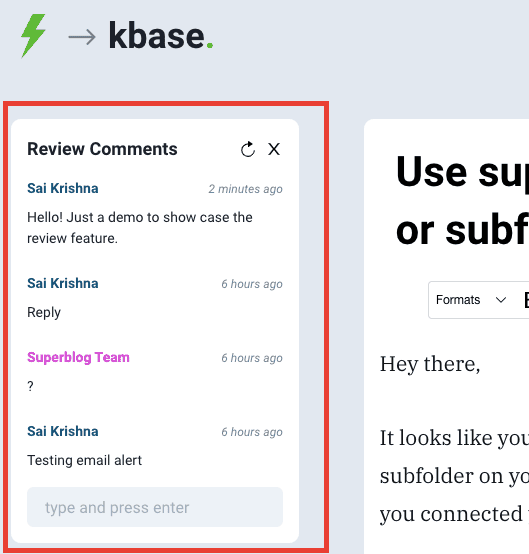
Review
Team members (editors, admins, owner) can review a post and leave comments in the editor itself. An email notification will be sent for each comment to the post's author and to anyone else that participated in the review.
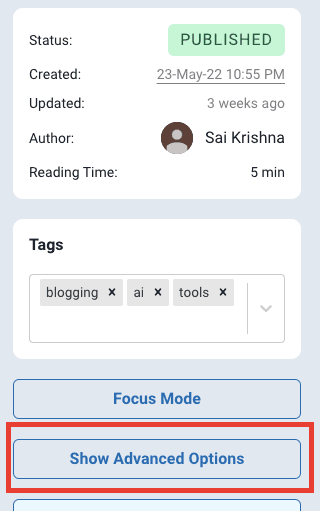
Tags
You can add related tags to a post. These will be added to your post as meta keywords. Be wise, do NOT stuff keywords here. Your readers can browse posts based on the tags.
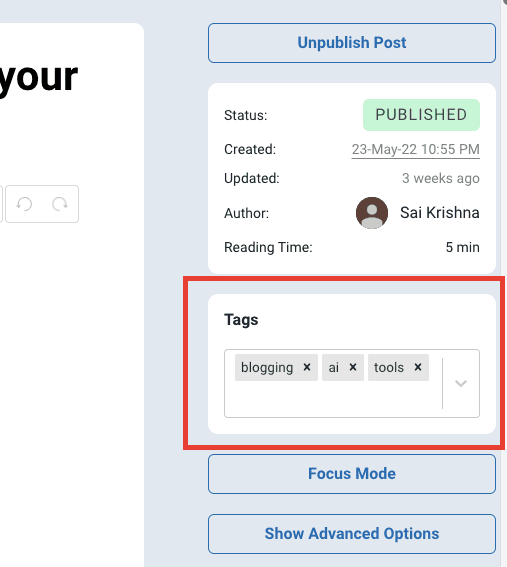
Preview
This is how the tags added to a post are displayed on your Superblog.
Categories
You can create categories to group your posts. Select or create new Category in the post editor page.
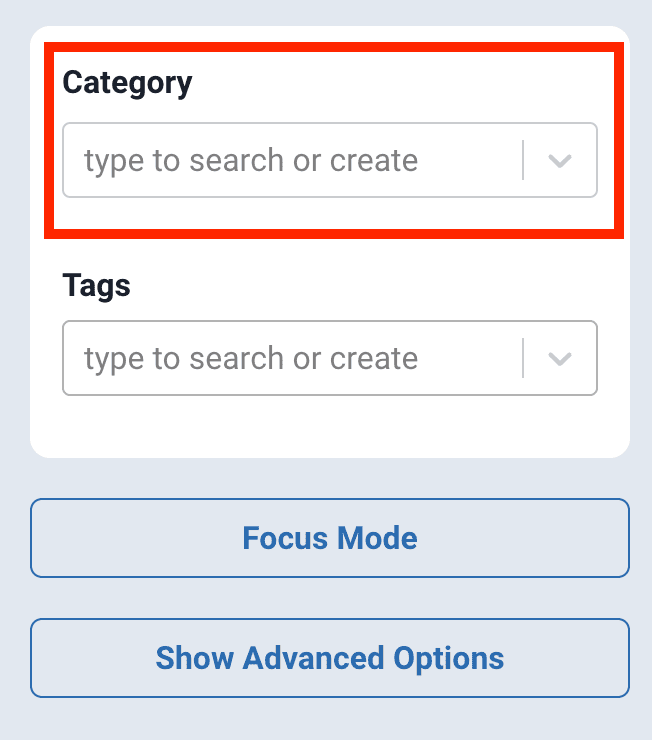
Then you can choose what categories to be dispalyed on the homepage.

Callout CTA Section
You can add a bold callout CTA section in your post to drive traffic from a blog post to your required destination url. You need to click the "CO" button in the editor's toolbar.
Preview
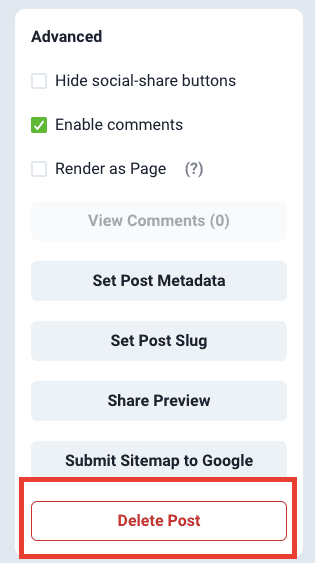
Advanced Options
There are several advanced options to modify a post if you want finer control. Click the Advanced Options button to see them.
Social sharing icons
You can show/hide social sharing icons for each post. A global setting is also available to enable/disable for blog-wide control.
Click the Advanced Options button in the post editor to see this button (you can find it on the right side).
Comments
You can show/hide comments for each post. A global setting is also available to enable/disable for blog-wide control.
Click the Advanced Options button in the post editor to see this button (you can find it on the right side).
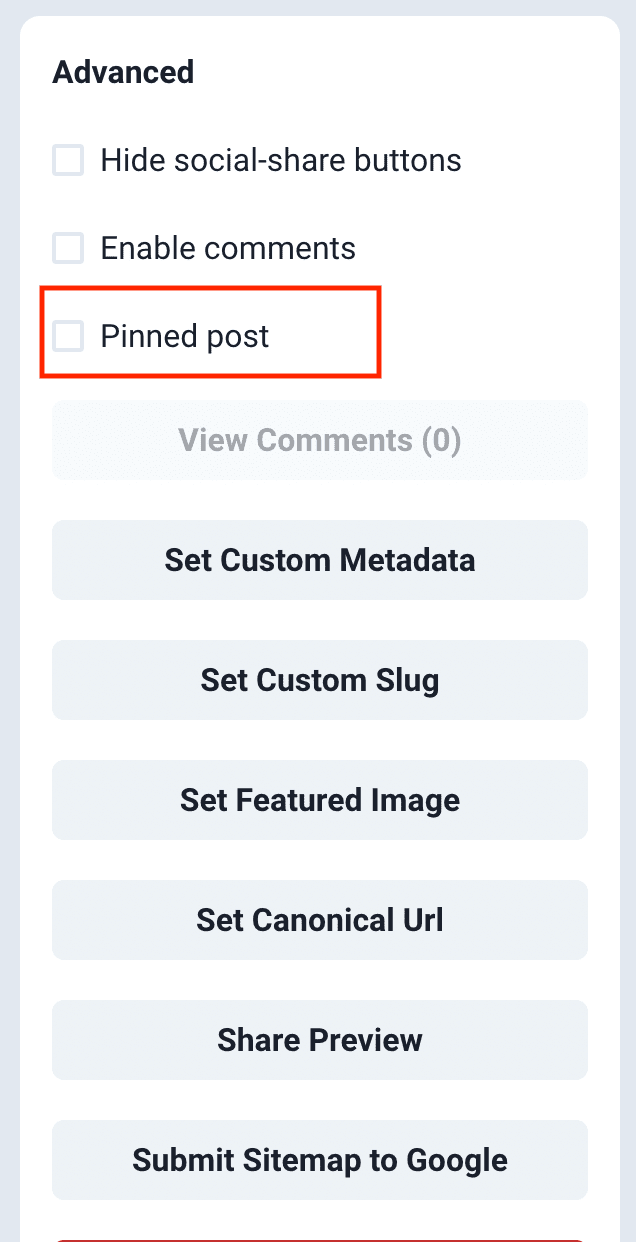
Pinned post
You can pin a post to the top by checking this box. It will be always displayed on the home page as a featured post.
Click the Advanced Options button in the post editor to see this button (you can find it on the right side).
Meta Title & Description
You can set a post's meta title and description by clicking the "Set Post Metadata" button. This is an advanced option and should be modified ONLY if you know what you are doing.
Click the Advanced Options button in the post editor to see this button (you can find it on the right side).
Post URL/slug
Superblog automatically generates a post URL/slug from the post's title. But if you prefer assigning a custom URL/slug to the post, you can do it by clicking on the Set Custom Slug button.
Click the Advanced Options button in the post editor to see this button (you can find it on the right side). You can also use nested slugs for a post.
Examples:
https://example.com/blog/my-post-1https://blog.example.com/my-post-2https://example.com/blog/travel/my-post-3https://example.com/blog/tech/my-post-4
Note
-
You might have noticed a unique set of characters being attached to every post’s URL as shown below. That is the post id.
-
Superblog creates the post URL in the below format if you haven't set a custom slug.
Example: https://example.com/blog/my-example-post-title-1cko8rasqs5nerasf0g
This is the standard structure for superblog URLs. You need not worry about them.
-
Do they affect SEO?No.
-
Can you change it?Yes.
-
You need to manually assign a slug to a post for custom URL. Otherwise the auto-generated slug will be generated using the title of the post.
Schema Markup
Schema Markup (also known as structured data) is a powerful tool for enhancing your website's SEO and improving how your content appears in search engine results. It provides search engines with additional context about your content, making it easier for them to understand and categorize your pages.
If you add FAQs to your post, they are automatically added to the Schema Markup.
Why is Schema Markup important for SEO?
-
Rich Snippets: Schema markup can lead to rich snippets in search results, which are more visually appealing and informative, potentially increasing click-through rates.
-
Improved Search Visibility: By providing clear, structured information about your content, you increase the chances of appearing in relevant search results and featured snippets.
-
Better Understanding by Search Engines: Schema helps search engines comprehend the context and relationships within your content, leading to more accurate indexing.
Superblog offers two ways to implement Schema Markup:
- Auto
- Manual
1. Auto
Superblog automatically adds a valid JSON schema to all your blog posts.
Default schema:
<script type="application/ld+json">{"@context":"https://schema.org/","@type":"BlogPosting","author":[{"@type":"Person","name":"<Post Author Name>","url":"Author page url on your superblog"}],"headline":"Post Title","description":"It will be added if there is a meta description added by you""image":"<Post coverimage/thumbnail url>","publisher":{"@type":"Organization","name":"<Your superblog name that you added in settings>general","logo":{"@type":"ImageObject","url":"<Your logo url that you added in settings>advanced"}}}</script>
Note: Author type is Person by default. If you hide the author names via settings then this type will be set as Organisation and your website url will be added to maintain Schema standards.
2. Manual
You can add a schema markup (also known as structured data) for your posts (JSON LD/JSON+LD format) manually if you want to override the automatic schema.
Click on the Set Schema Markup button.
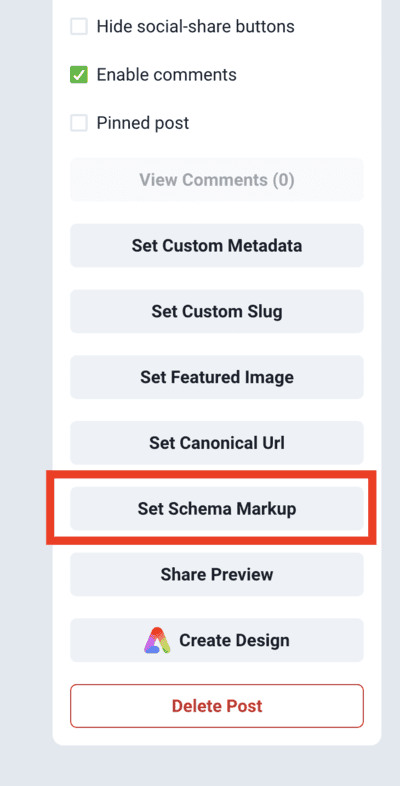
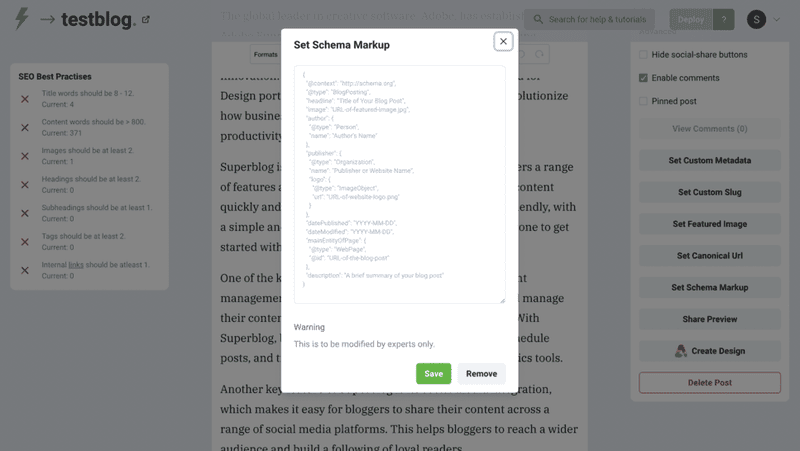
Click the Advanced Options button in the post editor to see this button (you can find it on the right side).
Example
<script type="application/ld+json">{"@context":"https://schema.org/","@type":"BlogPosting","@id":"https://dataliberate.com/2019/05/14/library-metadata-evolution-final-mile/#BlogPosting","mainEntityOfPage":"https://dataliberate.com/2019/05/14/library-metadata-evolution-final-mile/","headline":"Library Metadata Evolution: The Final Mile","name":"Library Metadata Evolution: The Final Mile","description":"When Schema.org arrived on the scene I thought we might have arrived at the point where library metadata could finally blossom; adding value outside of library systems to help library curated resources become first class citizens, and hence results, in the global web we all inhabit. But as yet it has not happened.","datePublished":"2019-05-14","dateModified":"2019-05-14","author":{"@type":"Person","@id":"https://dataliberate.com/author/richard-wallis/#Person","name":"Richard Wallis","url":"https://dataliberate.com/author/richard-wallis/",},"url":"https://dataliberate.com/2019/05/14/library-metadata-evolution-final-mile/","keywords":["Bibframe2Schema.org","Libraries","Library of Congress"]}</script>
Multiple Schema Markup
You can also add multiple schemas to a page using the same method. Just put your schemas in an array as shown below.
Example
<script type="application/ld+json">[{"@context":"https://schema.org/","@type":"BlogPosting","@id":"https://dataliberate.com/2019/05/14/library-metadata-evolution-final-mile/#BlogPosting","mainEntityOfPage":"https://dataliberate.com/2019/05/14/library-metadata-evolution-final-mile/","headline":"Library Metadata Evolution: The Final Mile","name":"Library Metadata Evolution: The Final Mile","description":"When Schema.org arrived on the scene I thought we might have arrived at the point where library metadata could finally blossom; adding value outside of library systems to help library curated resources become first class citizens, and hence results, in the global web we all inhabit. But as yet it has not happened.","datePublished":"2019-05-14","dateModified":"2019-05-14","author":{"@type":"Person","@id":"https://dataliberate.com/author/richard-wallis/#Person","name":"Richard Wallis","url":"https://dataliberate.com/author/richard-wallis/",},"url":"https://dataliberate.com/2019/05/14/library-metadata-evolution-final-mile/","keywords":["Bibframe2Schema.org","Libraries","Library of Congress"]},{"@context":"http://schema.org","@type":"FAQPage","name":"FAQ on Widgets","description":"Find answers to the most popular questions about our range of widgets","url":"https://www.example.com/faq","numberOfItems":2,"itemListElement":[{"@type":"ListItem","position":1,"item":{"question":"what color widgets do you sell?","answer":"we sell blue and red ones"}},{"@type":"ListItem","position":2,"item":{"qusetion":"how much do the widgets cost?","answer":"1usd each"}}]}]</script>
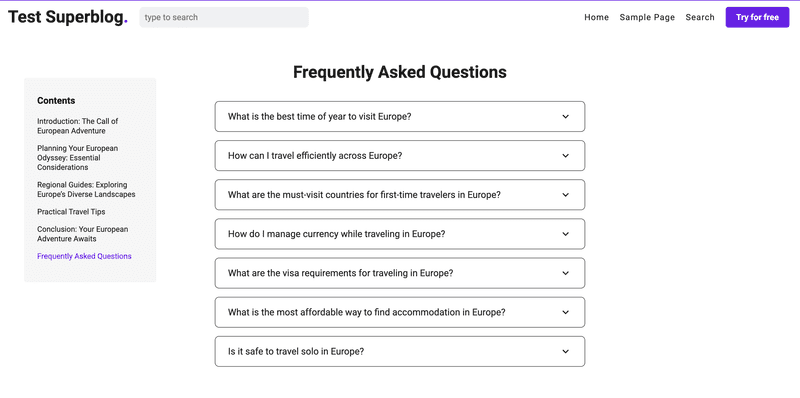
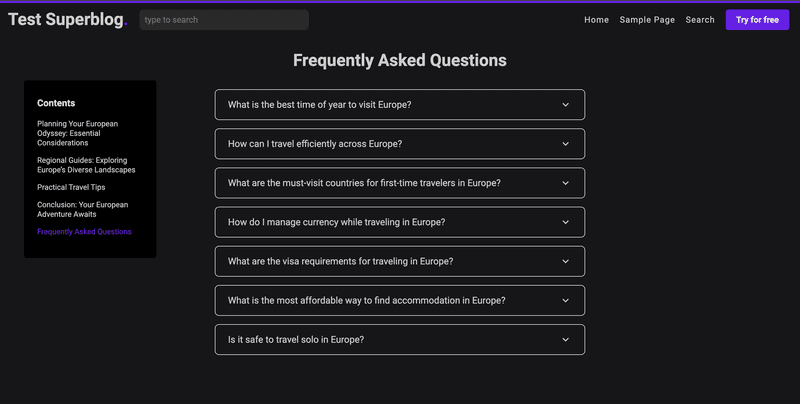
FAQ Module
You can add a Frequently Asked Questions module to your post. Just click on the Manage FAQ button. This is generally considered as a best practice for SEO. If you add FAQs, the required Schema Markup is also automatically added to your post.
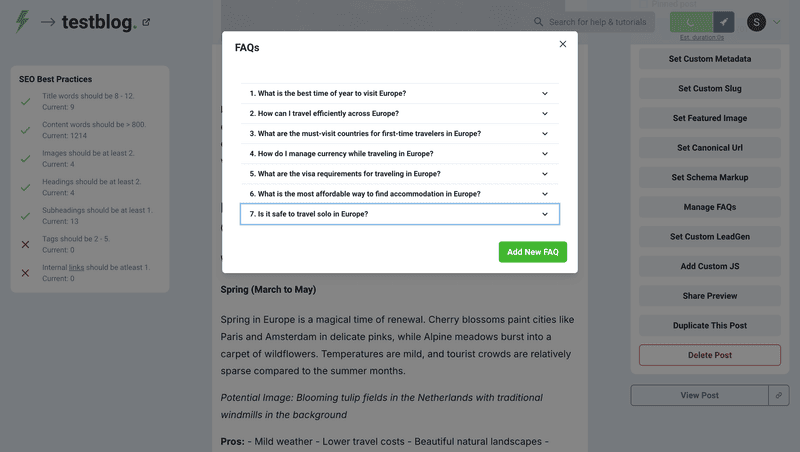
Preview
Custom Javascript
You can add custom js/code to every post easily. Click on the Add Custom JS button. Add the your <script> in the modal popup.
Share Preview
You can share a post that you are working on to someone outside of your team or to anyone with a simple link. Click on the Share Preview button.
Click the Advanced Options button in the post editor to see this button (you can find it on the right side).
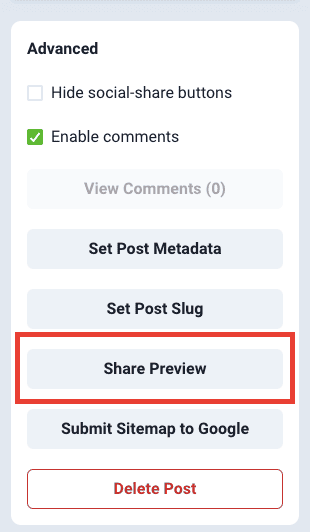
Note
This is a premium feature available only in PRO and higher plans.
Custom Canonical URL
You can set a post's canonical URL by clicking the "Set Canonical Url" button. This is an advanced option and should be modified ONLY if you know what you are doing. Superblog automatically generates accurate canonical URL automatically.
Click the Advanced Options button in the post editor to see this button (you can find it on the right side).
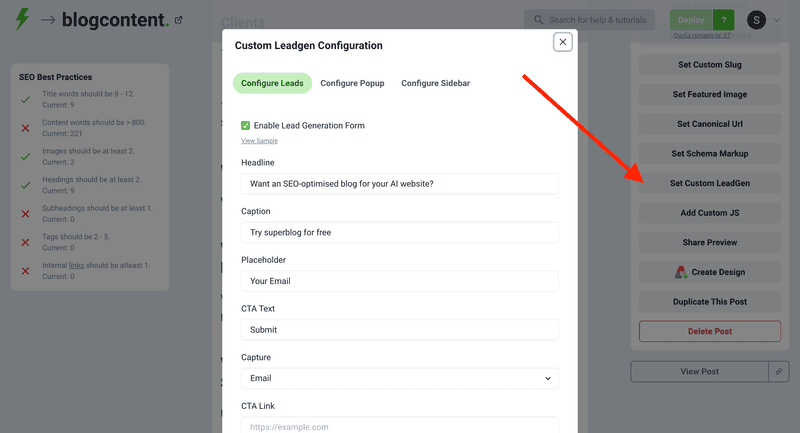
Custom Leadgen
You can add a custom leadgen form, exit intent popup or sidebar widget per post. This config will override the global leadgen settings.This is a premium feature available only in SUPER and higher plans.
Delete post
You can delete a post by clicking the "Delete Post" button. Deleted post cannot be recovered.
Click the Advanced Options button in the post editor to see this button (you can find it on the right side).
Thumbnail / Cover image
You can add a custom featured image to a post. The ratio of the cover image must be 3:2 (width: height). This image is not shown in the post. It is used for post thumbnail only. It is also used as OG Image (open graph image) for the social sharing preview.
If you don't add a featured image then Superblog uses the first image in a post as the thumbnail/cover image (banner image) for the post. The images you upload will be scaled without losing proportions accordingly. Also, the images are auto-compressed to reduce their size and load fast.
You can upload the first image to be in the ratio of 3:2 (width:height) to be displayed correctly in the cover image. If there is no image present in a post then Superblog will automatically render a dynamic image as the cover image.
If you do not add an image in your post or assign a thumbnail to your post, superblog will add beautiful dynamic thumbnails to your posts automatically.
Social Preview / OG Image
Read above
Note
If you change the first image in your post and want the social media to show the latest image as preview image then you need to force the said social media to refresh to their cache. Here is an article that explains how to refresh social media preview image.
Alternative Text vs Insert Description
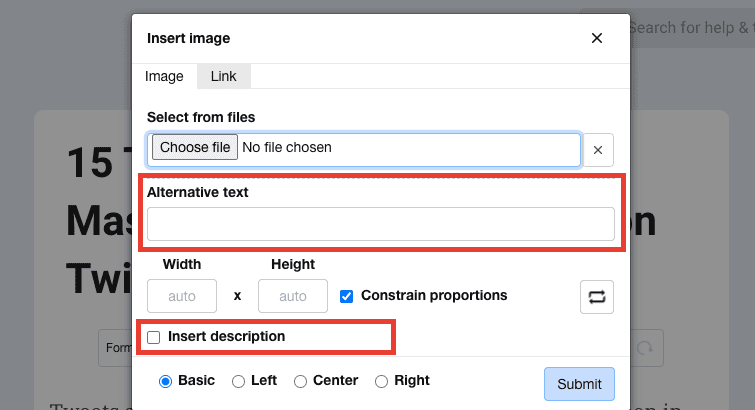
When you try to upload an image in the post editor, you can see Alternative text and Insert description fields.
- Alternative text is shown when an Image isn’t available. (standard web practice, also useful for SEO)
- Description is shown below the uploaded image. This is typically used to describe the image or credit the image's source or photographer.
Embed
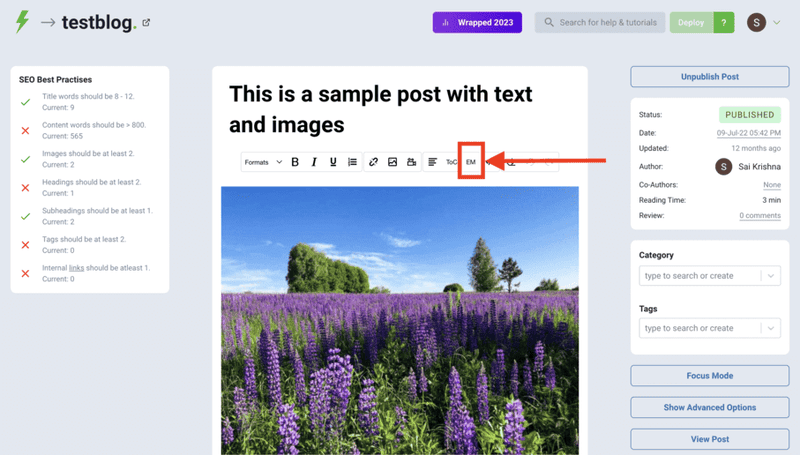
You can embed external iframes, widgets, media players, polls, quizzes, forms, etc into superblog posts.
You need to click on the "EM" button in the editor's toolbar and then paste the HTML Embed code. Give a name for your embed.
You should see a blank reserved space for the embed with the name given by you. Once you click “Deploy” and visit the post URL, you can notice that the embedded content is visible and interactive.
Sample Embed Code for Spotify
<iframestyle="border-radius:12px"src="https://open.spotify.com/embed/track/4WmB04GBqS4xPMYN9dHgBw?utm_source=generator"width="100%"height="152"frameBorder="0"allowfullscreen=""allow="autoplay; clipboard-write; encrypted-media; fullscreen; picture-in-picture"loading="lazy"></iframe>
Live Demo:
https://testblog.superblog.cloud/testing-embeds-from-3rd-part-websites/
Supported Image formats
You can embed images of all popular formats like PNG, JPEG, GIF, WEBP.Some SVG images might be broken after uploading, please try to use other formats.
Internal links
You can add anchor links within the same post or page.
- Click the
code viewbutton in the editor's toolbar. - Select the text you want to link to and wrap it like this:
<span id="my-link">target element</span>. - Click the
code viewbutton again. - Select the text to add an anchor tag by clicking the
linkbutton in the toolbar. - Give the address as
#my-linkand click submit.
This blog is powered by Superblog. Visit https://superblog.ai to know more.
Embed Posts
Author: Sai Krishna Author URL: https://superblog.ai/docs/author/sai-krishna Published: 2025-12-16 Meta Description: You can embed your most recent posts from superblog in any webpage or app. URL: https://superblog.ai/docs/embed
You can embed your most recent posts from superblog in any webpage or app.
This is available on ALL plans.
How to
- You can fetch the posts data by sending a simple
GETrequest to your superblog's RSS feed xml or json. - Once the data is retrieved from fetch request, then you can render the posts to match your UI.
RSS Feed URL
If example.com/blog is your superblog’s URL then your RSS feed is: https://example.com/blog/rss.xml
If blog.example.com is your superblog’s URL then your RSS feed is: https://blog.example.com/rss.xml
RSS Feed JSON API
If example.com/blog is your superblog’s URL then your RSS feed JSON is: https://example.com/blog/rss.json
If blog.example.com is your superblog’s URL then your RSS feed JSON is: https://blog.example.com/rss.json
You can do a GET request and render the response data (most recent posts) on mobile or website. It is RSS 2.0 spec-compliant and hence can be used with any other software too. for example zapier or zoho workflow.
API Example
NodeJS Code
// replace it with your superblog rss json
const url = "https://superblog.ai/blog/rss.json";

const res = await fetch(url);
const data = await res.json();
Python Code
import requests

// replace it with your superblog rss json
url = "https://superblog.ai/blog/rss.json"

res = requests.get(url)
data = res.json()
Response Data Sample
{
"status": "ok",
"feed": {
"title": "blog name",
"link": "https://example.com",
"image": "https://example.com/image.jpg"
},
"items": [
    {
"title": "Example title",
"pubDate": "2022-05-23 17:25:29",
"link": "https://example.com/blog/example-post",
"guid": "abcd123",
"thumbnail": "https://example.com/thumbnail.jpg",
"description":"Hello World!"
    }
]
}
Live example: https://superblog.ai/blog/rss.json
This blog is powered by Superblog. Visit https://superblog.ai to know more.
FAQ
Author: Sai Krishna Author URL: https://superblog.ai/docs/author/sai-krishna Published: 2025-12-16 Meta Description: These are some of the common and frequently asked questions that might come up when using superblog. URL: https://superblog.ai/docs/faq
These are some of the common and frequently asked questions that might come up when using superblog.
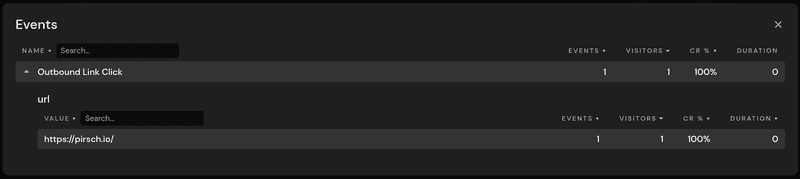
Can we track outbound links?
Tracking outbound links is a common requirement for bloggers. It lets you know how often an external URL was clicked, which page the clicks occured on, etc.
Superblog provides this feature out-of-the-box. External link clicks will be tracked as events on your analytics dashboard. They will be displayed as Outbound Link Click, but you can expand the event to reveal the external links that have been clicked by your visitors.
Why are many pages of my superblog not indexed on Google?
You might be seeing that certain pages of your superblog are not indexed on Google. This can be observed from your Google Search Console or other SEO tools like Ahrefs or SEMRush.
This is 100% intentional.
They are all tag/category/navigation/comments pages (Not blog posts). They are good with no index tag. We are not blocking Google to read it, we are only asking not to index those pages to avoid competition among your own pages.
That's the whole point of superblog. You don't need to worry about these SEO best practices. They come with the platform.
Why is the content pasted from google docs and other sources badly formatted?
This is a common issue for text editors. Pasting content from outside sources will cause formatting issues.
How to avoid this issue
You can export your content from Google Docs or Notion or other sources into .docx, or .html, or .md (markdown) files and then import that files into Superblog for seamless experience.
Read more: https://superblog.ai/docs/dashboard/posts#import-post
Can we add author info/bio below the blog posts?
Yes. You can have complete author profile for each team member.
Why the pagespeed score is low for my Superblog?
Superblog targets for 90+ score in Google's Lighthouse Audit on an average (combination of all the scores). If your superblog has less than 90, then the below could be possible reasons:
- You might have added large Javascript to your superblog.
- You might have added large embeds in your blog post. (ex: twitter threads, apple podcasts, etc).
- You might have embedded Youtube player directly using embed code. Instead, embed it by clicking "Video" icon in the post editor's toolbar.
- You have added Google Analytics or Gtag scripts (there is an inbuilt tracking module for superblog which is lightweight) or maybe you are using custom tracking scripts that could be causing an issue.
- If you configured your superblog on a subdirectory (for example: yourwebsite.com/blog), then the request will hit your server first to handle the reverse proxy. So please check if it is causing delays in response and rewrites (proxy) which will reduce the pagescores.
- You might be auditing the home page of your superblog. You should audtiting the post URL to get the accurate scores.
Why the lighthouse (core web vitals) assessment failed for blog URLs?
This will happen only when you are using superblog on a subdirectory due to the below reasons. Just click on the i icon as shown in the below image.

-
If you click on the
iicon as shown in the above image, you will understand that the real world data is not available for this particular URL and hence Google is showing the aggregate data for the entire website (including ALL your pages, not just blog). So, this is not a problem from superblog's side. You need to fix your website's performance. -
Since you are using superblog on a subdirectory (for example: yourwebsite.com/blog), then the request will hit your server first to handle the reverse proxy. So please check if it is causing delays in response and rewrites (proxy).
Why do I see my blog post URLs twice in Google Search Console or other Analytics solutions?
If you haven't configured redirect of URLs ending with and without forward slash (/), then you will see 2 urls of same post in your analytics solution (could be search console or google analytics, etc.) as the users could end up on different versions of the URL. (but google will only index one URL, i.e, your preffered URL because superblog sets canonical URL by default).
Example:
https://mywebsite.com/blog/my-post-abc
https://mywebsite.com/blog/my-post-abc/
You might need to set a redirect one URL to other (your preferred URL) on your server. This only happens if you configured superblog on your subdirectory.
What is the sitemap URL for my superblog?
Your superblog's sitemap.xml is always at the root.
For example:
https://blog.yourwebsite.com/sitemap.xml (subdomain)
https://yourwebsite.com/blog/sitemap.xml (subdirectory)
Why are my latest posts not getting indexed on Google?
Make sure your site's configuration is correct. Your website's robots.txt should contain your superblog's sitemap.
Here's a example of correct config: https://superblog.ai/robots.txt
Note
- First of all, google has a certain crawl budget for each website. Depending on your content quality, age of website, no number articles, etc. google will crawl your website at a certain rate.
- If you list your blog post URLs manually in your sitemap.xml then you can skip mentioning your superblog's sitemap in the robots.txt. However, just do it no matter what.
- If the problem remains even after the above, try to manually index the URLs in Google Search Console.
- If the problem remains even after the above, your content is of low quality.
How to automatically approve comments from a specific user?
Generally, users need to approve their comments before they are published on your blog by verifying their email address every time they post a comment.
But if you want to approve comments from a specific user automatically, then you can do it by following the below steps.
- Open the specific post in your dashboard and click on the "Advanced Options" button.
- You will see a button called "View Comments", click on it.
- Then click on "Approve Email" next to the email address of the comment you want to approve.
From now on, all the comments from that user email will be automatically approved and published on your blog. You can disapprove the email anytime by clicking the "Disapprove Email" button.
Magic link for email sign in is invalid
Two reasons:
- The link must have expired (15 minutes max validity)
- Your email provider/client might have scanned the link in your email inbox which invalidated it. (it is a one-time usage link)
Did not receive the magic link?
If you didn't receive the magic link, check your spam or junk folder. Sometimes emails can get filtered there. If you still don't see it, try requesting a new link.
Why is my superblog subdomain indexed on Google?
For example: mysite.superblog.cloud.
It means you haven't configured your custom domain fast enough before Google indexed your content. Do not worry, once you configure your custom domain, Google will remove the superblog domain from search results because canonical URL is set to your custom domain automatically. The subdomain will be live because of how the tech works and Google will know the actual page URL via canonical URL and sitemap.
Why is the meta title and meta description different in Google search results?
Google is known to automatically rewrite meta tags. Superblog publishes exactly what you wrote in dashboard. Read more: https://www.searchenginejournal.com/google-changes-more-than-61-percent-of-title-tags/435618/
You can view HTML source to confirm or install any plugin in chrome to see your metadata.
Why the <lastmod> for post url is different than the last updated value of the post?
For sitemap <lastmod> dates, you should use the timestamp when the actual URL content was last modified. For example, if you updated your navigation menu, then the <lastmod> for all the post urls should be updated to the timestamp of that update.
Here's the reasoning and best practices:
What <lastmod> represents:
The <lastmod> element tells search engines when the content at that specific URL was last changed. This includes any visible changes to the page, not just the core content like blog post text.
In your scenario:
Even though your blog post content hasn't changed in a week, the page itself has been modified because:
The navigation menu is part of the page content The HTML structure/output has changed Users visiting the URL will see different content than before
Therefore, you should use the timestamp when the page was regenerated with the new menu.
This blog is powered by Superblog. Visit https://superblog.ai to know more.
Custom Domain
Author: Sai Krishna Author URL: https://superblog.ai/docs/author/sai-krishna Published: 2025-12-16 Category: Dashboard Category URL: https://superblog.ai/docs/category/dashboard Meta Description: View Dashboard > Custom Domain URL: https://superblog.ai/docs/dashboard-custom-domain
View Dashboard > Custom Domain
You can connect Superblog to your own domain. It can be a subdomain or subdirectory.
Once you enter your desired URL like blog.example.com or example.com/blog in the text box, click the Connect button to receive instructions.
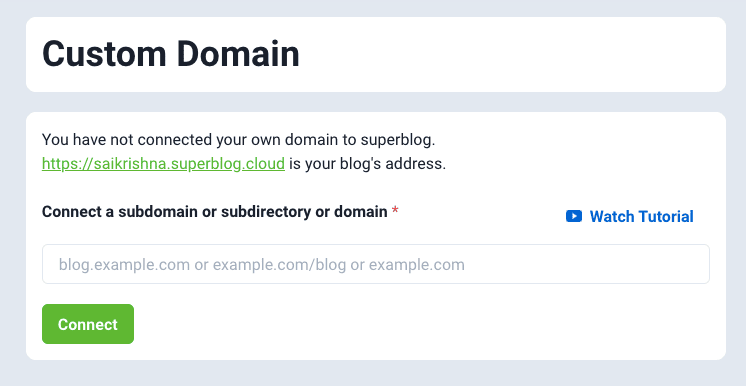
Subdomain
Connecting your subdomain blog.example.com to Superblog is probably the easiest way. If you are non-technical or not really focused on SEO then choose this method.
However, most SEO experts say to use a subdirectory instead of a subdomain. Read more about this here.
Subdirectory
For the SEO benefits, prefer connecting your blog to a subdirectory like example.com/blog. Configuring this is a bit technical and might require expert guidance.
But do not panic, once you connect your required URL, step-by-step instructions will be shown in the Superblog dashboard itself. You can select your tech stack to receive the configuration details.
It'll take around 10 minutes to configure superblog on your subdirectory.
This blog is powered by Superblog. Visit https://superblog.ai to know more.
Categories
Author: Sai Krishna Author URL: https://superblog.ai/docs/author/sai-krishna Published: 2025-12-16 Category: Dashboard Category URL: https://superblog.ai/docs/category/dashboard URL: https://superblog.ai/docs/dashboard-categories
View Dashboard > Categories
You can select a category for a post from the post editor page.
Categories on Home page
You can add categories section on your blog's homepage.
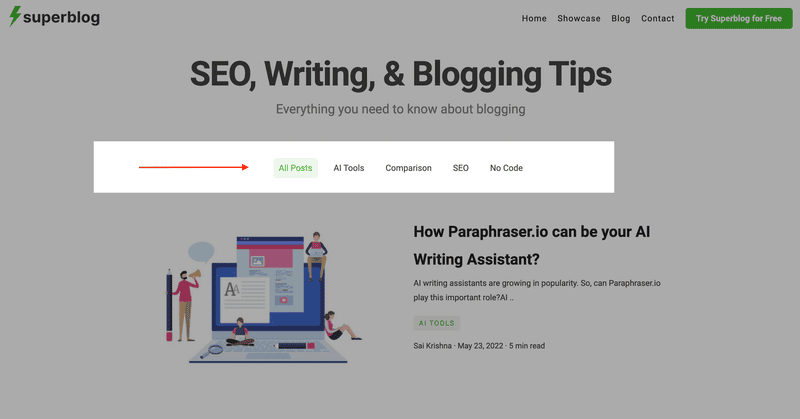
How to configure
Visit View Dashboard > Settings > Advanced section
Note
If a post has no category assigned then the first tag of the post is displayed below the post title on the homepage.
Exclude posts of certain categories from homepage
You can select certain categories to be excluded, then the posts of those categories will not be displayed on the homepage but they will be available as individual posts on their specific urls.
How to configure
Visit View Dashboard > Settings > Advanced section
This blog is powered by Superblog. Visit https://superblog.ai to know more.
Deploy
Author: Sai Krishna Author URL: https://superblog.ai/docs/author/sai-krishna Published: 2025-12-16 Category: Dashboard Category URL: https://superblog.ai/docs/category/dashboard Meta Description: Whenever you make any change in your Superblog like updating settings, adding a new post, editing a post, or anything else you can see the "Deploy" button is activated. It is seen in the top right of the dashboard. URL: https://superblog.ai/docs/dashboard-deploy
Whenever you make any change in your Superblog like updating settings, adding a new post, editing a post, or anything else, you can see that the "Deploy" button is activated. It is seen in the top right of the dashboard.
You need to click the "Deploy" button to make those changes live. You do NOT need to click "Deploy" after every change. Instead, make all the changes you want and then Deploy once in the end. ONCE.
You will get an email alert after your Superblog is deployed.
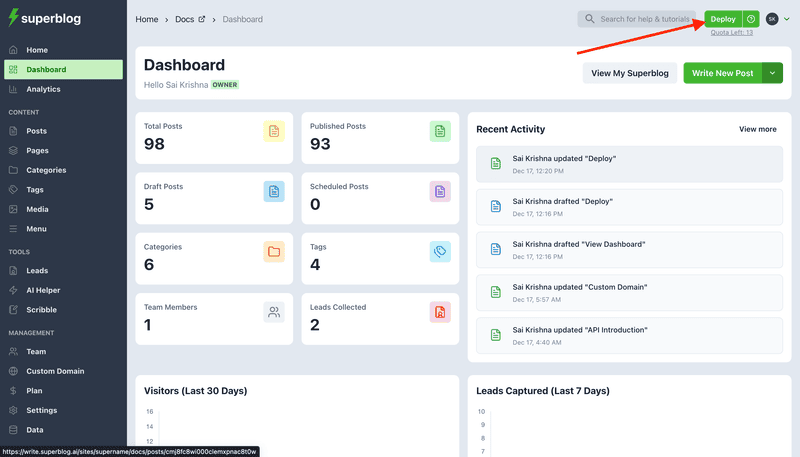
Why does it take time to deploy ?
You might have noticed that Superblog is blazing fast when compared to WordPress, Medium, Ghost, and almost any other blogging platform out there. It is because Superblog uses a new technology.
If you click the ‘Deploy’ button then your entire blog is re-built into small bits and pieces. Then those are optimized for Speed and SEO to be stored in multiple locations around the world (CDN). That's why it takes a minute or two to deploy.
When a visitor wants to read your blog, it is served from a server that is located nearest to that visitor.
What is deploy limit?
If you have received an email that says "You have reached deploy limit" then do not panic. It is simply a measure to prevent abuse of the platform.
The best approach is to make a number of changes (like updating settings, editing existing posts, publishing a new post, changing theme color, etc.,) and then click the 'Deploy' button ONCE at the end.
However, if you need more quota for a day, you can write an email to support to get it reset.
Activate the deploy button
If Deploy button is disabled for some reason then you can click on the Question Mark next to the deploy button to activate it manually.
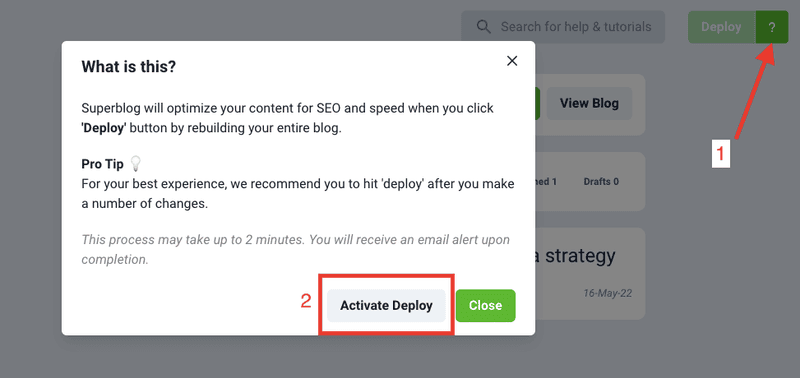
Pro Tip
Deploy button gets activated whenever you make a change in your dashboard. For example: edit a post, change a setting, add a menu item, etc.
Instead of clicking deploy each time, you can perform all activities and click deploy once in the end.
This blog is powered by Superblog. Visit https://superblog.ai to know more.
Menu
Author: Sai Krishna Author URL: https://superblog.ai/docs/author/sai-krishna Published: 2025-12-16 Category: Dashboard Category URL: https://superblog.ai/docs/category/dashboard Meta Description: View Dashboard > Menu URL: https://superblog.ai/docs/dashboard-menu
View Dashboard > Menu
Superblog has a beautiful navigation menu options to help your blog's visitors browse your blog. There are two menus available.
- Navigation Menu
- Footer Menu
Navigation Menu
Footer Menu
Menu items
You can manage the menu items from dashboard. They can be edited, deleted or rearranged by dragging across the list to edit the navigatio
… [truncated — open the raw llms.txt above for the full file]
llmtxt.app – AI SEO & Search Engine Optimization Directory